
Extreme heat kills about 1,300 people in the U.S. each year, and buildings are part of the problem. If I want a building to stay safer during a heat wave, I need to do three things first: block heat at the envelope, cut sun at windows and roofs, and plan cooling for grid stress or outages.
Here’s the short version:
- Start with the shell. Air sealing, insulation, thermal breaks, and roof performance lower indoor heat gain.
- Control window heat. Keep window area in check, limit west-facing glass, and use exterior shading.
- Use passive cooling where it fits. Cross-ventilation, stack ventilation, and night flushing can help, but only in the right climate.
- Cool the site too. Trees, lighter ground surfaces, and reflective roofs and walls can lower surface and nearby air temperatures.
- Don’t size HVAC for an average summer. Check future weather files and outage conditions, not just old climate data.
- Plan for failure. A cool room, ceiling fans, and materials that hold up under long heat exposure can make a big difference.
A few numbers stand out:
- Urban areas can run 10°F to 15°F hotter than nearby rural areas
- Some lower-income neighborhoods are about 13°F hotter
- Cool roofs can lower roof surface temperatures by more than 68°F
- Trees can cut surface temperatures by up to 35°F
- Fans can let people stay comfortable at about 4°F higher thermostat settings
If I had to boil the whole article down to one point, it would be this: heatwave-ready design is about lowering heat gain before leaning on AC. That applies to both new buildings and retrofits.
‘Architecture, city design a front line of defence’ against heatwaves, expert says • FRANCE 24

sbb-itb-aa28329
Core Design Principles for Extreme Heat
Heatwave-ready buildings start with the shell: the envelope, glazing, and ventilation. The main idea is simple: cut heat gain before leaning on mechanical cooling. When a building blocks heat first, it has a better shot at staying safer during outages and periods of peak heat.
Start with a High-Performance Building Envelope
The building envelope – walls, roof, and foundation – is the first place heat gets in. That’s why air sealing comes first. Seal rim joists, sill plates, and utility penetrations before adding insulation.
For walls, continuous rigid insulation helps cut thermal bridging that standard framing often leaves behind. Structural Insulated Panels (SIPs) and Insulated Concrete Forms (ICFs) can also deliver stronger thermal resistance than conventional framing. On the roof side, high insulation works best when paired with a radiant barrier behind the roof deck.
Thermal mass matters too. Concrete, masonry, and other heavy materials can soak up heat during the day and release it at night. That helps flatten temperature swings and lower peak cooling demand. It can also slow the rise of indoor temperatures during outages.
If the shell underperforms, every other cooling move has to pick up the slack.
Reduce Solar Heat Gain at Windows and Walls
Windows can drive a lot of unwanted heat, so size and placement matter. A window-to-wall ratio (WWR) of 30% to 40% is a practical target. California’s Title 24 code caps multifamily and non-residential buildings at 40%. Once you go past 50% WWR, cooling loads usually climb fast, even with high-performance glass.
Orientation matters just as much as glass area. West-facing facades deserve extra caution because afternoon sun brings the heaviest heat gain. If you need to cut load somewhere first, west-facing glass is usually the place to start since it lines up with the hottest part of the day.
For south- or west-facing glazing that stays, specify the lowest SHGC that still supports daylight needs. Exterior shading – like fixed overhangs, canopies, louvers, or operable shutters – beats interior blinds because it blocks solar radiation before it gets inside the building. Light shelves on south and west facades can help push daylight deeper into the space while shading the lower part of the window.
Once glazing is under control, the focus shifts to ventilation and then exterior shading.
Use Natural Ventilation Where Climate and Building Type Allow
Natural ventilation is not a one-size-fits-all move. It works only when the climate and building type support it. Used well, it can cut cooling loads and help with nighttime cooling. The key is to treat it as a climate match, not a default setting. The two main drivers are cross-ventilation, where air moves through openings on opposite sides of a space, and stack ventilation, where hot air exits high while cooler air comes in low.
Night flushing can be especially useful in places where outdoor temperatures fall a lot after sunset. Opening windows or using actuated vents at night can cool the building’s thermal mass, which then helps steady indoor temperatures the next day.
Natural ventilation should be planned alongside HVAC, not as a substitute for it. During wildfire smoke events, it may need to shut down so the building can rely on high-MERV filtration and energy recovery ventilators (ERVs).
When ventilation options are limited, the next layer is passive cooling through shading, cool surfaces, and site design. The next step is passive cooling at the roof, wall, and site level.
Passive Cooling, Cool Surfaces, and Site Design
Shading, Night Flushing, and Reducing Interior Heat
When ventilation by itself can’t keep a space cool, the next move is to stop heat before it gets inside. Exterior shading does that better than anything else because it blocks sun before it hits the glass or wall. Fixed overhangs and louvers work well for permanent shade. Shutters and exterior screens give you more control when conditions change. Interior blinds can help, but they should be a backup, not the main plan. These steps also support passive survivability.
It also helps to cut heat from inside the building. During the hottest part of the day, appliances, lights, and cooking all add to the load. That means less plug use, less lighting, and less cooking during peak hours can make a noticeable difference.
Night flushing can help, but only when nights actually cool off enough to release stored heat. If you’re in a humid climate, or dealing with a heat dome where nighttime temperatures stay high, this tactic loses most of its punch.
Cool Roofs, Cool Walls, and Green Roof Options
After shading, the next step is to keep the roof and walls from soaking up so much heat in the first place. Lower roof, wall, and attic temperatures mean less cooling demand indoors. A cool roof does this by reflecting sunlight instead of absorbing it. Light, reflective surfaces can cut roof surface temperatures by more than 68°F compared with standard dark roofing.
LBNL found that cool walls can match or even beat cool roofs when it comes to lowering cooling loads. For cool walls, aim for at least 0.6 solar reflectance and 0.75 thermal emittance. For both roofs and walls, the Cool Roof Rating Council (CRRC) directory is a solid place to check verified solar reflectance and emittance ratings.
Cool roofs do their best work when they sit above strong insulation.
| Option | Solar Reflectance / Effectiveness | Durability | Approx. U.S. Cost (USD/sq ft) | Best-Fit U.S. Climate Zones |
|---|---|---|---|---|
| Reflective Coating | High (SRI > 78) | 5–10 years | $0.75–$1.50 | All (Best in Sun Belt) |
| Single-Ply Membrane (TPO/PVC) | High | 15–25 years | $5.00–$10.00 | All |
| Coated Metal Roofing | Moderate to High | 30–50+ years | $10.00–$20.00 | All |
| Green Roof (Extensive) | Low reflectance / High evapotranspiration | 40+ years | $15.00–$30.00 | Temperate / Humid |
| Exterior Louvers/Shades | High (blocks ~80% of solar gain) | 10–20 years | $20.00–$60.00 | Hot / Sunny |
Green roofs take a different path. They don’t reflect much sunlight, but they cool through evapotranspiration – plants release moisture into the air, and that helps pull heat away. They’re usually a better fit in temperate or humid climates. They also cost more upfront, though a 40+ year lifespan can make the math work in the right setting.
Landscape and Hardscape Choices That Lower Local Heat
The site around the building matters too. Hot ground and paved areas can throw heat right back at the structure long after sunset. Trees help a lot here. They can cut surface temperatures by up to 35°F and lower nearby summer air temperatures by 3°F to 9°F. Deciduous trees on the east and west sides are especially useful. They block harsh summer sun, then let winter sun through after the leaves drop.
Hardscape gets ignored all the time, but it plays a big role. Unshaded asphalt and concrete act like heat batteries. They absorb heat all day, then give it back well into the evening. Swapping dark paving for light-colored or permeable materials around entrances, parking areas, and outdoor work zones can lower the air temperature in those spots. For cool hardscape, an initial solar reflectance of at least 0.33 is the target.
In drought-prone parts of the U.S., low-water planting can still help cool a site without driving up irrigation demand. A simple mix works well:
- Permeable paving
- Trees placed for shade where it counts most
- Low-water ground cover
Done together, those choices can cut site heat without heavy water use.
HVAC, Materials, and Construction Delivery for Heat Resilience
Size and Operate HVAC for Heatwaves, Not Just Average Summer Days
Once the building shell and site plan cut down heat gain, the next job is making sure the mechanical system can still do its job when a heatwave hits.
Bigger HVAC equipment isn’t always better. In fact, oversized systems often backfire. They short-cycle, struggle with humidity control, and wear out sooner. A better move is to size equipment to local design temperatures, then let passive measures like the envelope, shading, and thermal mass carry part of the load.
If you want a clearer picture of how a building will handle hotter years ahead, model peak-heat performance with future climate files, not just past summer averages.
That setup works best when right-sized cooling is paired with shading, fans, and other passive load-reduction moves. The goal isn’t just comfort on a normal July day. It’s keeping indoor temperatures safer when outdoor heat gets brutal.
On the equipment side, heat pumps can outperform standard AC units during heatwaves. Ground-source heat pumps (GSHPs) stand out even more because they pull from stable ground temperatures instead of hot outdoor air. For backup planning, a designated cool room with a mini-split that can run on backup power is a practical way to focus cooling where people need it most. Ceiling fans help too. They can keep occupants comfortable at thermostat settings about 4°F higher than spaces without fans, which cuts peak electrical demand.
Choose Materials That Hold Up Under High Solar Exposure
Extreme heat speeds up wear, so material choices matter more than they might seem on day one. Building thermal performance can fall by 20% to 30% over a 20-year period, which makes early decisions on assemblies and finishes a big deal.
For roofs and walls, use cool finishes with a high solar reflectance index (SRI). Just as important: get the details right. Precision flashing and solid air sealing help protect long-term performance.
Where indoor temperature spikes are a major concern, phase change materials in walls or ceilings can help delay heat moving into occupied spaces.
Workforce Readiness for Heat-Resilient Construction
Even the best design can fall flat if the field work is sloppy.
Heat-resilient buildings depend on crews who know how to install and tune key systems the right way. That includes envelope detailing, cool roof installation, ERV commissioning, and automated shading integration. A weak air seal or the wrong refrigerant charge can wipe out much of the gain built into the design.
HVAC commissioning deserves extra attention. Before occupancy, systems need to be checked for correct refrigerant charge and airflow. After that, buildings need regular recalibration during operation so performance drift gets caught before it turns into a bigger problem. LEED v5 now includes prerequisites for construction management that address worker heat-stress protocols on-site, including hydration, rest schedules, and heat monitoring.
ABLEMKR helps project teams mobilize pre-vetted crews by certification, safety training, availability, and location.
Applying Heatwave Adaptation to New Builds and Retrofits
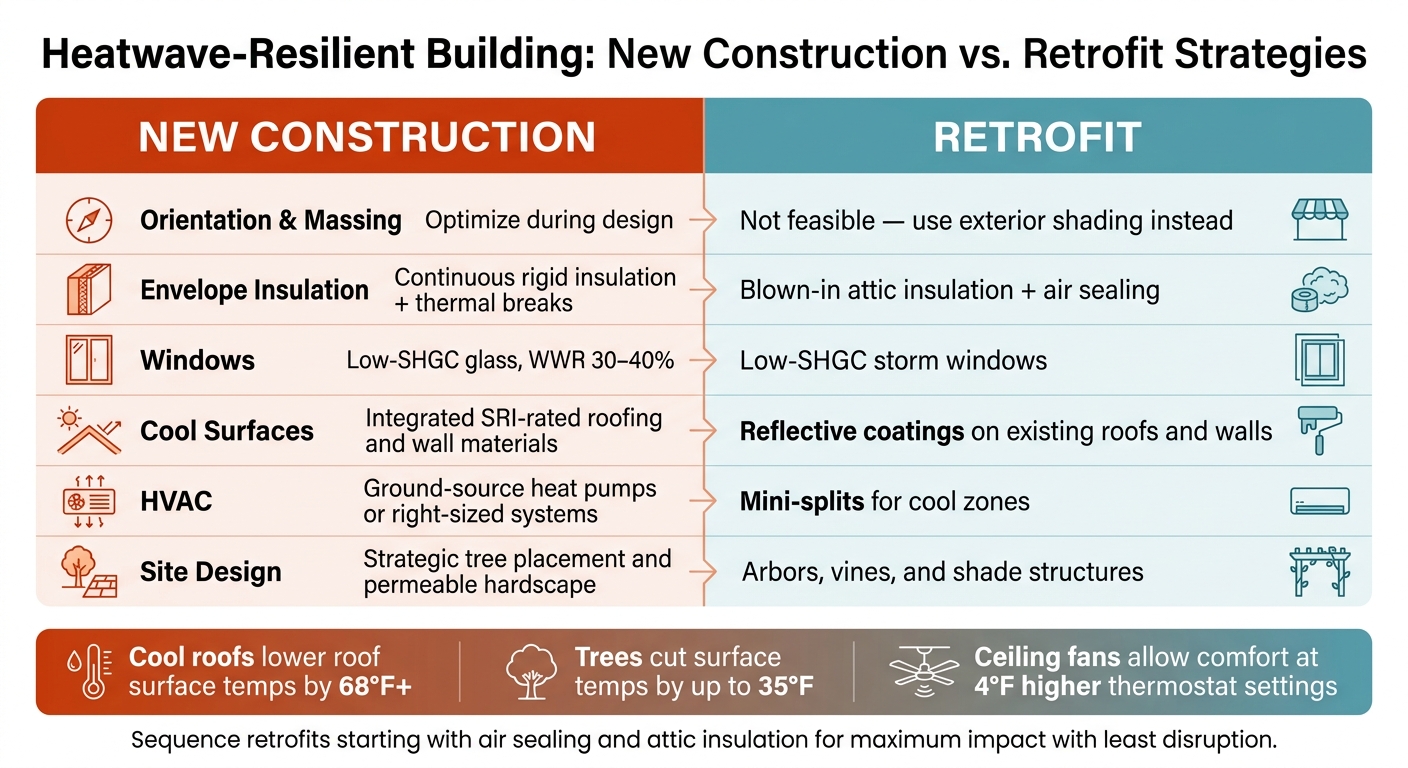
New Construction vs. Retrofit: Heatwave-Resilient Building Strategies
After the design principles, the next step is deciding where to use them: in new construction or in retrofit planning.
Design Process, Codes, and Performance Targets
Heatwave performance should be part of schematic design, not something patched in at the end. Teams should model buildings with future weather files, not just past climate averages, to test how they perform during extreme heat and power outages.
Bora Architecture & Interiors did exactly that at Legin Apartments, a 124-unit affordable housing project in Portland. The team modeled Portland’s 2021 heat dome and found that a code-minimum unit hit unsafe indoor temperatures during outage testing. A higher-performance assembly changed the outcome. With continuous insulation, low-e glazing, tight air sealing, and simple occupant actions – shades closed during the day and windows open at night – the unit cut hours above 85°F to zero. That’s the point of future-weather modeling: it helps teams make better calls before construction begins.
Codes are starting to move in this direction too. LEED v5 now includes credits tied to extreme heat response and thermal safety.
Retrofit Priorities vs. New Construction Priorities
New construction and retrofits need different playbooks.
In a new build, the biggest decisions happen early, before a single wall is framed. That includes orientation, limiting west-facing glazing, shaping the building for self-shading, and building continuous insulation with thermal breaks into the base assembly.
In a retrofit, those options are more limited. You can’t turn the building to face another direction. But you can add exterior shading, use cool roof or wall coatings, seal air leaks at rim joists and attic penetrations, and install ceiling fans. The goal isn’t just lower utility bills. It’s keeping people safe when the power goes out.
The tools are often the same. The pressure points are not.
| Strategy | New Construction | Retrofit |
|---|---|---|
| Orientation & massing | Optimize during design | Not feasible; use exterior shading instead |
| Envelope insulation | Continuous rigid insulation + thermal breaks | Blown-in attic insulation + air sealing |
| Windows | Low-SHGC glass, WWR 30–40% | Low-SHGC storm windows |
| Cool surfaces | Integrated SRI-rated roofing and wall materials | Reflective coatings on existing roofs and walls |
| HVAC | Ground-source heat pumps or right-sized systems | Mini-splits for cool zones |
| Site design | Strategic tree placement and permeable hardscape | Arbors, vines, and shade structures |
For occupied buildings being upgraded in phases, sequencing matters a lot. Start with air sealing and attic insulation. They tend to cause less disruption, have a strong payoff, and help in both hot and cold weather. After that, add exterior shading. Mechanical upgrades can come later, once envelope work has already lowered peak loads.
If a full-building upgrade isn’t possible, a designated cool zone can still make a big difference.
Conclusion: The Most Important Steps for Buildings in Extreme Heat
These project-level choices bring together the envelope, shading, ventilation, HVAC, and material decisions covered earlier. Heatwave planning works best in layers: start with a well-insulated, well-sealed envelope and controlled solar gain; add passive cooling through exterior shading, night flushing, and thermal mass; then size HVAC with future climate data and pick durable, high-reflectance materials that can resist the 20% to 30% thermal degradation seen over 20 years.
Whether it’s a new build or a retrofit, the target stays the same: a building that keeps occupants safe, stays usable under stress, and holds its performance over time – not just on a normal summer day, but during the next heat dome.
FAQs
What should I retrofit first for heat resilience?
Start with your building’s thermal enclosure to cut heat gain. Focus first on air sealing and continuous, high-quality insulation.
It also helps to keep the window-to-wall ratio at 40% or less and add exterior shading, especially on west-facing facades. If a full retrofit isn’t on the table, set up a cool room or cool zone so people have a safer place to shelter during power outages.
When does natural ventilation stop working?
Natural ventilation stops working well when outdoor temperatures stay high, especially overnight. In most cases, it relies on cooler night air to flush heat out of a building.
During heat waves, that setup can fall apart. If nights stay hot, the building has no good way to dump stored heat outside. At that point, ventilation can do the opposite of what you want: it may pull in more heat and humidity, which adds to the indoor cooling load.
How do I design for a heatwave power outage?
Prioritize passive strategies that help keep indoor temperatures in a safe range without mechanical cooling. Cut solar heat gain with high-albedo roofing and cladding, exterior shading on south- and west-facing walls, high-performance windows, and an airtight, well-insulated envelope with thermal breaks.
Add operable windows for night flushing, set up a thermally isolated cool zone on lower floors, and use on-site renewable energy with battery storage to keep key fans or heat pumps running during grid failures.


