
Underwater welding training is long, strict, and built around safety first. From what I see in this article, most students spend 6 to 12 months in training, complete 40 to 160 classroom hours before water work in many programs, and may log 228+ classroom hours across the full program.
If you want the short answer, here it is:
- I’d expect training to start with welding theory, dive physics, physiology, and electrical safety
- Then move into tank work, wet welding, cutting, and dive control
- Then finish with inspection, emergency drills, written tests, and practical qualification checks
- Most employers want more than a certificate – they want dive logs, weld test results, safety records, and proof of training
This article shows a clear path: learn topside welding, train as a commercial diver, practice in controlled water, then prove your skills on paper and in the water.
A few points stand out right away:
- Wet welding is done in the water with waterproof electrodes
- Dry hyperbaric welding is done inside a sealed dry space at depth
- Students are often trained as commercial divers first, welders second
- Written exams often require 70% to 80% to move forward
- Water training covers body position, communication, umbilical control, cutting, and welding in flat, horizontal, vertical, and overhead positions
- Final job readiness depends on records, not just course completion
I’d sum it up like this: underwater welding programs teach how to dive, how to weld, how to inspect the work, and how to stay alive while doing it.
Below, the article breaks down how that training is taught step by step.
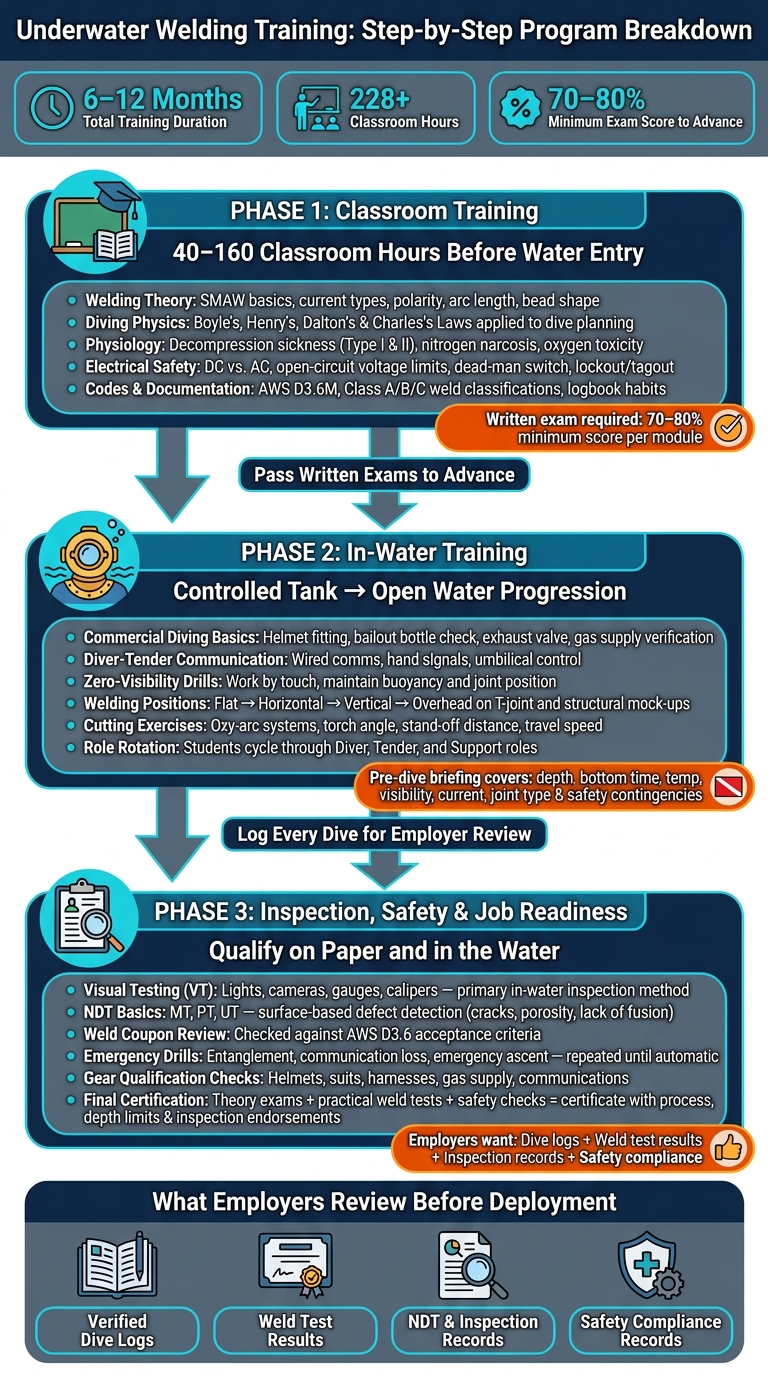
Underwater Welding Training: Step-by-Step Program Breakdown
How Classroom Training Builds Welding, Diving, and Code Knowledge
Most U.S. programs require 40 to 160 classroom hours before students enter the water. A common setup uses one- to two-week blocks of full 8-hour days. Training usually starts with diving physics and physiology, moves into welding theory, and then adds codes and documentation.
Schools such as the Divers Institute of Technology require students to pass written exams in each theory module before they’re cleared for wet-welding labs. That order matters. It gives instructors time to spot weak areas and fix them before students get in the tank. Since students come in with mixed experience levels, the classroom phase gets everyone using the same terms and working from the same standards before water training starts. That shared base carries straight into tank drills.
Welding Theory for Wet and Dry Underwater Work
Classroom welding modules focus on shielded metal arc welding (SMAW) basics shaped for underwater work. Instructors cover current types, polarity, arc characteristics, arc length, and travel speed. They also show how each setting changes bead shape and penetration.
Students study cross-sections of weld coupons to spot porosity, slag inclusions, lack of fusion, and undercut. They compare acceptable and rejectable results side by side against AWS criteria. That makes the difference easier to see before they have to produce the weld themselves.
Many programs also use a paper-weld exercise. Students write down the joint, position, and settings before welding. Instructors grade the sequence and parameter choices on paper first, which helps students build a mental picture of the job before they ever enter the tank.
Programs may also use defect boards with mounted coupons that show what happens when joint prep is skipped or electrodes are mishandled on carbon-manganese steels used in pipelines and offshore platforms. Instead of learning that lesson the hard way, students can see the problem right in front of them.
Diving Physics, Physiology, and Underwater Electrical Safety
Instructors connect Boyle’s, Henry’s, Dalton’s, and Charles’s laws to actual dive decisions. This isn’t taught as abstract science. Pressure, gas management, and ascent planning directly affect how long a diver can weld and still return to the surface safely.
Class lessons tie those laws to choices divers make on the job, such as why controlled ascent rates matter after finishing a weld at depth and how longer bottom times change decompression planning. Students calculate bottom time, decompression stops, and gas needs for a repair at a set depth. Then they check the plan against dive tables or computers used in the field.
Physiology sessions center on recognition and reporting. Students work through symptom charts for Type I and Type II decompression sickness, role-play how to report nitrogen narcosis or oxygen toxicity to a supervisor, and discuss how cold water and heavy exertion increase physiological stress.
On the electrical side, instructors stress that underwater welding uses DC, not AC, because AC raises shock risk. Before any water exposure, students cover open-circuit voltage limits, knife switches, dead-man switch protocols, and lockout/tagout procedures on paper. They also rehearse circuit tracing and isolation-point identification in a dry shop first.
Codes, Documentation, and Written Testing
After the technical basics, programs shift to the rules that control inspection and acceptance. AWS D3.6M Specification for Underwater Welding is the main code reference in U.S. underwater welding classrooms. Students learn to read weld classifications – Class A, B, and C – and understand how those classes connect to acceptance levels on offshore and marine structures.
Instructors also use anonymized project documentation so students can practice tracing code clauses to specific acceptance criteria. That kind of work gets them ready for inspector feedback on job sites, where knowing the weld isn’t enough – you also need to know how it will be judged.
Along with code study, students build logbook and documentation habits by recording dive profiles, tasks performed, tools used, and any unusual conditions. They fill out weld reports, list observed discontinuities, and cite the relevant code clause. In plain terms, they learn to record dives, welds, and defects the way supervisors and inspectors expect on the job.
Programs typically require a minimum score of 70–80% on written module exams covering safety, physics, procedures, and codes before students move to more demanding in-water tasks. Those scores act as the gate to tank work and reflect how schools usually sequence skill development.
Scenario-based questions push students to apply concepts instead of just memorizing terms. That mirrors the QA/QC reviews they will face on actual U.S. projects. Once students pass the written phase, they move into in-water welding, cutting, and dive execution.
sbb-itb-aa28329
How In-Water Training Teaches Welding, Cutting, and Dive Execution
After the classroom portion, students take the rules, safety steps, and dive-planning basics into the water. Most programs start in shallow indoor tanks, where conditions stay controlled and instructors can watch every move up close. Some schools even use camera systems so students can get feedback on body position and arc stability in real time.
Basic Commercial Diving Skills Before Welding at Depth
Before a student is allowed to strike an arc underwater, they have to show they can handle the dive itself. That starts with solid surface-supplied diving procedure: putting on the helmet or full-face mask the right way, checking the bailout bottle, confirming exhaust valve function, and verifying gas supply before every entry.
Then comes communication. Students need to answer tender commands and depth updates the same way every time through wired comms, because underwater welding depends on tight diver-tender coordination. Umbilical control matters just as much. Trainees learn to keep the umbilical and welding leads neat and clear, without loose loops that can catch on steel or turn into an entanglement problem in the middle of a weld.
Programs also put students in zero-visibility water. At that point, they can’t lean on sight. They have to work by touch and by holding a mental picture of the workpiece. If buoyancy is steady, communication is clear, and the umbilical is under control, the diver has a much better shot at keeping the arc and joint position steady. Instructors don’t approve live welding or cutting at deeper stations until a student can manage position, communications, and umbilical control without trouble.
Underwater Welding Positions and Cutting Exercises
Welding practice usually moves in a clear step-by-step sequence. Students start with flat-position fillet welds on T-joint coupons in the tank. After that, they move to horizontal, vertical, and overhead positions on mock structural members. That setup forces them to weld the way they would on the job, with gravity and current working against them.
Cutting work focuses on oxy-arc systems. Students begin with straight plate cuts along marked lines, where they learn torch angle, stand-off distance, and travel speed. Instructors also push one safety point hard: keep cut depth per pass under control so molten metal doesn’t blow back toward the diver.
From there, the work gets closer to field repair. Students trim brackets and remove fake damaged members from mock structures, the kind of task they’d face on a corroded dock pile or a damaged barge stiffener. After each cut, they prep the edge by bevelling plate edges and cleaning surfaces so later repair welds can get proper fusion.
How Programs Structure Water Time and Skill Progression
Once students can handle single welds and cuts, training shifts to full task cycles, debriefs, and gear checks. Students rotate through diver, tender, and support roles, so they learn the whole operation instead of only the welding part.
A day usually starts with a pre-dive briefing that covers:
- Depth
- Expected bottom time
- Water temperature
- Visibility
- Current
- Joint type and welding position
- Safety contingencies, including emergency signals and power shut-off points
Before entering the water, students have to repeat hand signals and walk through their task sequence step by step.
As training moves to open-water stations like lakes or tidal rivers, dive time becomes task-based. A student might need to complete a multi-pass fillet weld within a set bottom time, for example. After each dive, instructors go over arc stability, body position, cut accuracy, and communication. They also inspect, clean, and store equipment before the next rotation.
Every dive is logged for employer review, which gives students a record they can point to when showing job readiness.
How Programs Teach Inspection, Safety, and Job Readiness
After the in-water work, training moves into inspection, emergency response, and the paperwork employers use to confirm someone is ready to work.
Visual Inspection, NDT Basics, and Weld Coupon Testing
Inspection training starts with visual testing (VT). It’s the main check divers can do in the water, and it sets up the rest of the NDT training. Students use lights, cameras, gauges, calipers, and rulers to check bead shape, size, and undercut.
From there, students get the basics of MT, PT, and UT. They learn what each method is for and when to use it to find cracks, surface flaws, and internal defects. Most of that hands-on MT, PT, and UT work happens on the surface, but instructors keep tying it back to underwater job conditions.
Practice coupons bring the whole lesson together. Students weld plates and pipe sections in different conditions, bring them topside, and inspect them for porosity, cracking, lack of fusion, and penetration problems. Instructors connect each defect to technique. For example, porosity may come from an unstable arc or contamination, while lack of fusion can point to travel speed issues or poor joint access. Welds are then checked against AWS D3.6 acceptance criteria.
Safety Drills, Emergency Procedures, and Final Qualification Checks
Safety training runs on repetition. Students drill entanglement, communication loss, and emergency ascent responses until the steps feel automatic.
Before they even get in the water, students learn job safety analysis, electrical isolation, and pre-dive checklists.
They also have to pass practical checks on:
- helmets
- suits
- harnesses
- gas supply
- communications
If a student can’t pass life-support and communications checks, they do not move on to advanced welding at depth.
Final qualification blends theory exams, practical weld tests, and safety checks. Programs may issue certificates that list process, depth limits, and inspection endorsements.
From Training Records to Workforce Deployment
Those final checks turn training into something employers can use right away. Graduates enter the job market with dive logs, welding and NDT certificates, and school evaluations that show safety performance and emergency drill participation. That’s the package employers review before assigning a diver-welder to a job.
What companies want depends on the work in front of them. Offshore construction firms look for people who can handle low visibility and current-affected conditions. Ship repair yards look for experience in confined hull spaces. Maintenance contractors line workers up with pipeline, pile, or structural repair work based on the processes and positions listed on their welding certificates.
For employers, ABLEMKR helps match pre-vetted workers by certification, safety training, availability, and location for shutdowns and remote repairs.
Conclusion: What Students and Employers Should Expect From Underwater Welding Programs
After the classroom, tank, and inspection phases, a strong program should move students from theory to controlled water work and then into qualification records.
For students, the schedule is tough. Plan for 6 to 12 months of training and at least 228 classroom hours before or alongside water work. Expect long days, repeated drills, and performance checks that measure both technical skill and safe execution. The point is simple: build safe, repeatable performance in changing conditions.
For employers looking at candidates after training, a certificate alone doesn’t say enough. The main thing is the full records package: verified dive logs, weld test results, inspection records, and safety compliance. Those are the records supervisors use when assigning diver-welders to active jobs.
Programs that follow recognized diving and welding standards produce the records employers want. Students should look for programs that issue verifiable qualifications. Employers should ask to see those records. That’s the value of a well-built underwater welding program: skill that can be proven both in the water and on paper.
FAQs
Do I need welding experience before enrolling?
No. Most underwater welding programs do not require prior welding experience to get started.
In most cases, admission depends more on training and safety standards than on past time with a welding torch. Schools usually look for things like medical fitness, fit-to-train screening for water-based exercises, and any offshore or on-site certifications the program calls for.
Once you’re in, you’ll usually be evaluated during training through performance exams and trade-specific certifications.
How much actual water time do students usually get?
It depends on the program, but training for offshore and underwater work usually blends classroom lessons with time in the water. For standard safety courses like BOSIET, the split is often about 40% classroom and 60% practical simulation.
Most courses last two to four days. A big chunk of that time goes to in-water drills, including helicopter escape training and pool-based survival exercises.
What records should I keep after training?
Keep digital copies of your training and certification records. That includes safety training credentials, welding qualifications, and any project-specific licenses. It also helps to save your work history and proof of completion, especially when you need to verify records during audits or hiring checks.
Just as important, track expiration dates and renewal or refresher training deadlines. A missed date can hold up a job fast. Staying on top of those deadlines helps you stay job-ready and avoid delays when a credential expires.


