
Wind-ready jobs are won or lost in the field. When clips are missed, nails are off pattern, or roof connections are weak, failures can start at 50–60 mph.
If I were setting up a crew for high-wind work, I’d keep it simple:
- Set the wind scope first from the plans and design data
- Turn code rules into crew tasks
- Train by role, not with one talk for everyone
- Run hands-on drills for sheathing, straps, and gable bracing
- Check the work before it gets covered
- Log photos, checklists, and fixes
- Clear workers before dispatch based on training, records, and field skill
The main point is simple: wind resilience depends on execution. Post-event reviews from FEMA and NIST keep pointing to the same weak spots – roof-to-wall connections, wall-to-foundation connections, and roof covering loss. So the training plan should stay fixed on those items.
You don’t need a long theory session. You need crews who can read the wind design basis, follow nail spacing, install connectors the right way, finish storm-prep steps at 72, 48, and 24 hours, and prove the work with photos and records. That is what keeps quality steady across jobs.
This article lays out that system in a clear order: scope, role training, field drills, documentation, and pre-dispatch checks.
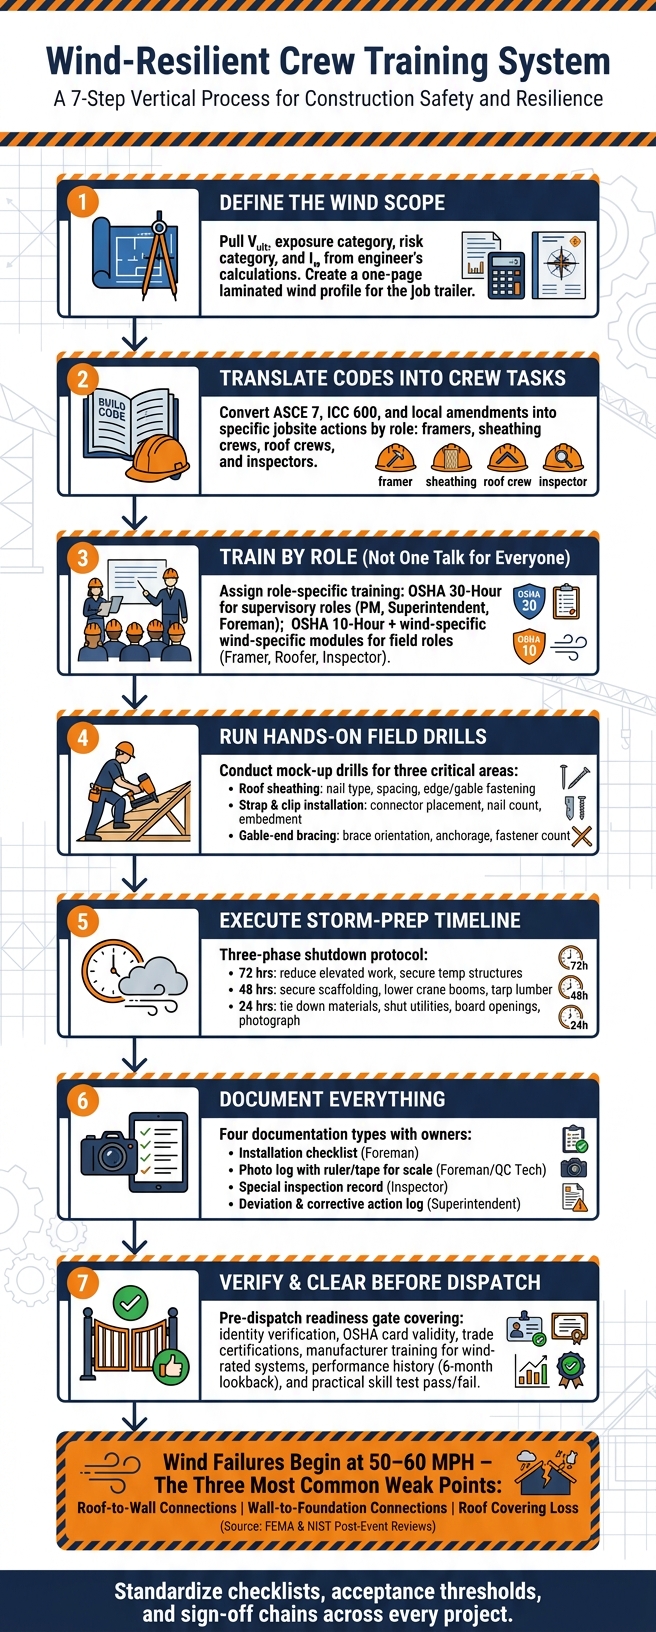
Wind-Resilient Crew Training System: 7-Step Field Execution Framework
Define the wind-resilient scope before training starts
Before training starts, pull the wind design basis from the engineer’s calculations: V<sub>ult</sub>, exposure category, risk category, and I<sub>w</sub>. These numbers drive connector selection, nailing spacing, and any special-inspection needs. In plain terms, this is the map the crew will follow.
Boil that down into a one-page wind profile. For example: 150 mph ultimate wind, Exposure C, Risk Category II. Post it in the job trailer as a laminated quick-reference sheet so the crew can check it without digging through plan sets.
Translate codes and plans into crew-level tasks
Review the adopted code, the referenced ASCE 7 edition, and any local amendments. In coastal or hurricane-prone areas, ICC 600 may also apply. When it does, it often means tighter nailing, more connectors, and stronger detailing at overhangs, gable ends, porches, and carports.
Then turn that code language into jobsite tasks people can act on:
- Framers install hurricane clips and check for full nail penetration.
- Sheathing crews follow the required edge and field nailing pattern.
- Roof crews fasten decking at the specified spacing.
- Crews confirm hold-down placement and stud alignment before sheathing starts.
- Use a separate diagram for gable-end bracing based on FEMA P-804 and ICC 600 details.
Train crews on the continuous load path: roof, trusses or rafters, walls, anchors, and foundation. If one clip is missing or one anchor is loose, that path is broken. Once that happens, failure can move through the building fast.
Identify inspection points by project phase
Build training around the moments when mistakes can still be fixed. A phase-based inspection map helps crews check wind-critical details while they are still visible. Supervisors and foremen should use the table below as a training guide, not just a compliance checklist.
| Phase | Key Wind Inspection Points |
|---|---|
| Framing | Anchors, hold-downs, shear wall layout, load-path connectors from foundation to roof |
| Roofing | Deck fastening pattern, underlayment laps and fasteners, roof-to-wall connectors |
| Exterior Envelope | Cladding attachment, window/door anchorage, garage door protection |
| Closeout | Final connector counts, bracing elements, impact-resistant systems, documentation |
If special inspections apply, supervisors need to know the inspection criteria before the visit. Finding a missed clip during framing takes minutes. Finding it after drywall can cost days.
With the wind scope defined, the next step is to assign each task to the role that does the work.
sbb-itb-aa28329
Build role-based training plans and field drills
One wind-safety talk won’t work for every job on site. Framers, supervisors, and project managers face different risks, so they need training built for what they actually do.
A simple fix is a one-page training matrix. Match each role to its required training, field task, and sign-off standard. Then use that matrix to assign work and confirm who’s ready.
Supervisory roles – Project Manager, Superintendent, and Foreman – need OSHA 30-Hour Construction. Field roles – Framer, Roofer, and Inspector – need OSHA 10-Hour Construction. The role list below covers wind-specific training only.
| Role | Required Training | Field Responsibilities | Pass/Fail Indicators |
|---|---|---|---|
| Project Manager | ASCE 7 wind criteria; local wind-code provisions; storm-prep windows | Develop emergency plan; set wind-speed triggers; coordinate with owners and authorities | Can explain the project wind design criteria and exposure category; correctly sequences 72/48/24-hour storm prep |
| Superintendent | Wind thresholds for work stoppage; site-wide securing procedures | Read forecasts, trigger checklists, assign roles, and stop work | Correctly identifies the wind-speed thresholds for stopping crane operations and work at height; executes the storm checklist within the defined time |
| Foreman | Wind-focused installation details; inspection sequences for clips, straps, and openings | Verify nail pattern before sheathing inspection; check the continuous load path; sign off on storm prep | Reads the nailing schedule and spots incorrect connector installation in the field |
| Framer | High-wind hazard awareness; connector and anchor installation | Install hurricane straps/clips, hold-downs, and gable-end bracing per design | Passes a mock-up drill: correct strap placement, required nail count, proper anchor spacing |
| Roofer | High-wind roofing module; manufacturer training on wind-rated fasteners | Fasten roof sheathing with specified nail type and spacing; install roof-to-wall straps | Passes a roof bay drill with the correct nail type and fastening schedule per project specs |
| Inspector | Wind inspection sequences; documentation standards | Verify nailing patterns, connector counts, and opening protection against wind design documents | Identifies incorrect gable-end bracing in an attic mock-up; correctly applies the high-wind inspection checklist |
Use the matrix to pair each role with the right mock-up and field drill. That way, training isn’t abstract. It looks like the work crews will do in the field.
For roof sheathing, build a small roof section and have crews install panels with the project-specified nail type and spacing. In high-wind regions, the drill should lock in the correct nail schedule and careful fastening at edges and gable ends. After installation, the foreman or inspector should measure spacing, check for over- or under-driven nails, and confirm that fasteners actually hit the rafter or truss below. A good habit here is checking from the attic. Run the drill again until workers can hit the pattern without being coached.
For strap and clip installation, use a mock wall-to-roof joint. Framers install hurricane straps with the specified connector and fastener count, and the evaluator checks placement, required nail count, and enough embedment. It’s a simple drill, but it tells you fast who knows the detail and who’s guessing.
For gable-end bracing drills, use an attic mock-up. Framing crews install 2×4 braces in the specified gable-end brace pattern, then tie them into trusses and the wall below with straps and specified fasteners. The evaluator checks brace orientation, anchorage, and fastener count.
After each drill, record a pass/fail result in the training matrix. If someone misses the mark, they repeat the drill before moving to live work.
Installation drills should then lead into shutdown drills for severe weather.
Storm response training works best when it mixes a tabletop review with a physical site walk-through and ties both to a fixed timeline. Crews should know what happens at 72, 48, and 24 hours before a forecasted high-wind event. No one should be trying to figure it out after a watch is issued.
- 72 hours: reduce elevated work, secure temporary structures, verify generators and pumps, protect excavations.
- 48 hours: walk the site, secure scaffolding, tarp lumber, lower crane booms, deploy sandbags.
- 24 hours: tie down materials, shut off utilities, board openings, take photos.
Pass/fail for storm response drills is simple: did the crew finish each checklist step on time, with the right roles assigned? If not, they need a remedial run-through before the next high-wind season or project mobilization.
Log every drill result so the readiness record stays current.
Document work and verify worker readiness before dispatch
Once crews pass drills, turn that effort into records that guide both quality checks and dispatch. If it isn’t documented, it’s hard to review, hard to verify, and even harder to fix later.
Use checklists, photo logs, and inspection records
Checklists should match the wind scope on the job. That means noting fastener type, fastener spacing and pattern, connector and strap locations, edge distances, anchor embed depths, and any departures from the structural or manufacturer specs, with corrective actions written down. Skip vague notes. Record the exact finding, the fix, and where it happened.
Photo logs carry just as much weight. FORTIFIED roof documentation, for example, requires at least four separate photo sets showing fastener spacing, sheathing thickness, and fastener type and size, plus a compliance form. To make those records easier to track, label each photo with the date, location, and crew lead.
A small detail helps a lot: include a ruler or tape in photos so size and spacing can be checked from the image itself.
| Documentation Type | Primary Owner | When to Complete | How It Reduces Wind-Related Defects |
|---|---|---|---|
| Installation checklist | Foreman | End of each activity, such as roof sheathing or strap installation | Catches missing fasteners, incorrect spacing, and uninstalled connectors |
| Photo log | Foreman or quality tech | Immediately after installation, before concealment | Provides visual proof of connector type, quantity, and pattern; supports remote review by PMs or engineers |
| Special inspection record | Building or special inspector | At code-required milestones, such as sheathing, framing, and envelope close-in | Verifies wind-critical fastening and anchorage; documents corrections with dates and inspector identity |
| Deviation and corrective action log | Superintendent | When field conditions differ from approved plans | Creates a traceable record of what changed, who approved it, and how it was resolved |
Apply pre-dispatch readiness checks
Credentials and training records should be checked before a worker arrives on-site, not during induction. That saves time and keeps avoidable problems from showing up at the gate.
Pre-dispatch checks should cover identity, current OSHA card numbers and expiry dates, trade qualifications, fall protection and equipment certifications, and any manufacturer-specific training for wind-rated systems.
Use those same records to clear each worker before mobilization.
| Readiness Check | Verification Criteria | Staffing Decision |
|---|---|---|
| Identity verification | Government-issued ID matches the worker record and photo | Hold dispatch until resolved |
| Certification review | Valid OSHA 10/30; fall protection; manufacturer training for wind-rated systems | All valid → cleared for high-wind work; missing manufacturer training → cleared only for support roles |
| Training date check | Core safety and severe-weather training within the policy cutoff | Exceeded → refresher training required before dispatch |
| Performance review | No serious safety violations or quality defects on wind systems in the past 6 months | Issues present → cleared with closer supervision or restricted to low-risk tasks |
| Practical skill check | Passes a controlled fastening or connector test | Fails → targeted coaching and re-test required before dispatch |
Use ABLEMKR to support qualification tracking and crew mobilization
For larger crews, it helps to keep these checks in one dispatch system instead of chasing records across texts, spreadsheets, and inboxes. ABLEMKR‘s mobile-first platform stores worker credentials, safety training records, and availability data, then matches pre-vetted workers to job sites based on certifications, training, availability, and geo-location.
Live worker status gives staffing coordinators a clear view of whether certifications are current and whether compliance flags have been cleared before dispatch is approved. That helps keep qualified crews moving and keeps underqualified workers off the site.
Conclusion: Build a repeatable wind-readiness system
Wind damage usually comes down to execution. A building can fail in design winds – or even lower – when connections, sheathing, nailing, or envelope details are done wrong.
The fix is pretty straightforward: define the scope, train each role, drill the details that matter most, document the work, and confirm job readiness before anyone is sent out. But that process holds up only if every crew is measured by the same standard.
That’s where standardization earns its keep. Use the same checklists, the same acceptance thresholds, and the same sign-off chain across projects. Change only what needs to change for local wind exposure, code rules, and structure type. Once those standards are in place, inspection trends and rework rates make weak spots easier to spot. You can see where training slipped before the next job begins.
Those records then become the dispatch gate. When staffing teams use ABLEMKR to clear workers with verified credentials, current training records, and field competency, dispatch moves fast and underqualified workers don’t make it onto the site.
Wind resilience is built during framing, sheathing, and installation. It comes from crews who know the details and can execute them under field conditions. When only verified crews mobilize, the building is more likely to match the wind design.
FAQs
What wind details should crews master first?
Crews should start with core safety protocols and local hazard awareness. Early training needs to cover GWO Basic Safety Training and OSHA-required standards, including fall protection, electrical safety, and lockout/tagout (LOTO).
They also need to spot site-specific weather risks, such as wind speeds that can change crane load charts, and know the safe clearance distances from overhead power lines.
How do you test if a worker is ready for high-wind jobs?
Test readiness with three checks: current certifications, objective task-based evaluations, and a site-specific Job Hazard Analysis before work starts.
Check records like GWO certifications. Then look at performance with field demos and rating scales. For high-risk work, confirm workers are qualified or authorized under OSHA. Also review live weather and site conditions before anyone steps on the job.
ABLEMKR can help verify profiles and certifications before dispatch.
What records should be kept before wind-critical work is covered?
Before wind-critical work starts, keep records that show the crew, gear, and job setup meet safety and compliance rules.
That usually includes:
- approved employees for specific high-risk tasks
- training records and certifications, such as GWO credentials and WINDA IDs
- equipment documents, including inspection logs, rigging, load charts, and operator manuals
- daily labor-hour, job-classification, and safety training logs
ABLEMKR can help centralize credentials and certification status, so teams can verify them in real time before dispatch.


