
Course hours don’t tell you if solar training fits the job. What I’d look for first is whether the program follows the way a PV project actually gets built: basics, sizing, site review, layout, wiring, code, inspection prep, startup, and maintenance.
Here’s the short version:
- New installers need roof work, wiring, grounding, mounting, and safety labs
- Design staff need load review, system sizing, layout, and permit-set skills
- Lead techs and service workers need inspection prep, testing, startup, and fault finding
- Code gaps matter: labeling shows up in 41% of project failures
- Inspection risk is high: about 24% of residential rooftop PV projects fail inspection in the data cited
- Long-term quality matters too: one study found only 20% of 80 inspected systems met safety, quality, performance, and spec standards
If I were comparing programs, I’d ignore flashy hour counts like 40 to 297.5 hours until I knew what those hours covered. A short course that matches the job can beat a longer one that teaches the wrong tasks.
Preview – Online Residential Solar Design and Installation Course
sbb-itb-aa28329
Quick comparison
| Training track | Best for | Main focus | Practice level |
|---|---|---|---|
| Design-focused | Estimators, design support, sales engineers | Bills, sizing, layout, production, permits | Low to medium |
| Installer-focused | Helpers, installers, field crews | Site survey, mounting, wiring, bonding, roof safety | Medium to high |
| Advanced field / commissioning | Lead installers, foremen, service techs | Inspection prep, testing, startup, service docs, fault finding | High |
Bottom line: I’d judge solar training by job fit, not seat time. The right path teaches people not just what to do, but how to check the work, document it, and get it through inspection without rework.
Solar Design Foundations and System Sizing
PV Basics, System Types, and Key Terms
Start with the basics of how a PV system works. Solar modules turn sunlight into DC electricity. An inverter then changes that DC power into AC electricity a home or business can use. Wiring, disconnects, racking, combiners, and monitoring hardware make up the balance of system (BOS).
Training should also spell out the three system types workers run into in the U.S.: grid-tied, battery-backed hybrid, and off-grid. Each one changes how power moves through the system, whether batteries are part of the setup, and what the installer or designer needs to handle.
Before anyone steps onto a job site, they should know terms like string, array, DC-to-AC ratio, peak sun hours (PSH), nameplate rating (kWdc), inverter clipping, and derating factors. These aren’t just buzzwords. They shape how a system is sized and how its output is estimated, which leads straight into load review.
Load Review, Energy Use, and Sizing Logic
Good sizing training doesn’t begin with panels. It begins with the customer’s actual electricity use. That means looking at 12 months of electric bills, finding average monthly kWh, and setting the target offset.
Two sizing methods are commonly taught side by side. For grid-tied systems, bill-based sizing starts with annual kWh use and converts that number into kW. Load-based sizing works from the bottom up: list appliance wattage and runtime, total the daily kWh, then divide by peak sun hours and system losses. Students should be comfortable with both before moving into layout or equipment selection.
What Weak Sizing Training Leaves Out
Sizing accuracy depends on site conditions, not just panel count. Weak training often starts with the number of panels instead of the load. It may also skip shading analysis, roof orientation, and tilt, even though each of those can cut system output.
Another big gap is the difference between rated output and actual output. A 10 kW array will not produce 10 kW all the time. In practice, output drops because of temperature effects, wiring losses, inverter efficiency, soiling, and module degradation over time. If training skips those losses, workers can’t set clear production expectations. And once that part is off, the layout and installation work that follows can be off too.
From Site Assessment to Hands-On Installation Skills
After sizing, training should move from paper plans to actual roof work: layout, hardware installation, and field safety.
Site Survey and Panel Layout
Training needs to turn a paper design into a roof plan that can actually be built. A solid site survey module should teach workers how to gather real field measurements, including roof pitch, azimuth, shading sources, structural condition, setbacks, and access paths. Then they need to use that data to make layout choices. Those measurements should guide module placement, attachment points, and roof access.
Start by marking no-go zones: fire access paths, vents, chimneys, skylights, and setbacks. From there, trainees can place modules around those limits. Layout practice should also show a simple truth from the field: a smaller, cleaner array often goes in faster and cuts down on rework.
Wiring, Grounding, and Mounting Practice
Wiring skills need hands-on practice with real parts. Labs should cover wire selection, conduit routing, terminations, torque checks, and string polarity. Cut-away samples of loose lugs and over-torqued terminals help make failure points easy to see.
Grounding and bonding need focused practice too. Trainees should install bonding hardware across rail splices and test continuity with meters. Instructors should show how incomplete bonding can energize racking and conduit, then have trainees trace fault-current paths on one-line diagrams.
Mounting practice should match the roof types workers are likely to see on the job:
- Asphalt shingle
- Tile
- Metal
- Flat roofs
- Ground-mount systems
Full-size roof mockups give trainees a place to practice finding rafters, drilling pilot holes, applying flashing the right way, and torquing lag bolts to spec. Mounting systems should match the roof type and local wind, snow, and UV conditions. The same rule applies here as it does with wiring: match the hardware to the site, then check the work in the field.
Safety Habits Built Into Field Training
Rooftop solar training should build fall protection into every lab instead of treating it like a one-time orientation.
Fall protection, ladder setup, and tool handling should be part of every graded lab. Each time trainees step onto a mock roof, they should inspect and use harnesses, anchors, and lifelines as part of the exercise. Ladder setup should be practiced during actual roof access, including the 4:1 rule, three-point contact, and top tie-off. Field labs should also include tailgate briefings before each task, just like the safety meetings common on U.S. job sites. When safe behavior counts just as much as technical accuracy in grading, workers stop seeing safety as a separate lesson and start seeing it as part of the job itself. That shift can cut down on correction work during inspection and commissioning.
Code, Inspection, and Maintenance Skills That Build Job Readiness
NEC Basics, Permits, and Compliance Documents
After installation, workers have to show that the system matches the plan set, code, and what the inspector expects. Job-ready workers don’t just know how to install equipment. They know why it’s built that way, and they can show that the finished work lines up with the documents.
The main code references are NEC Articles 690 and 705, along with the parts of Articles 250 and 110 that apply here. No one needs to memorize every subsection. But workers do need to use the rules for conductor sizing, overcurrent protection, equipment grounding, bonding, and working clearances in actual field layouts. One area trips people up all the time: labeling. IBTS data shows labeling appears in 41% of project failures.
Rapid shutdown is another weak spot in many training programs. NEC 690.12 says PV conductors inside the building must drop below 30 V within 30 seconds after activation. So workers need to know which parts meet that rule, where the initiation device is located, and how to place the required labels the right way. This is one of those topics where paper training isn’t enough. People need real hardware, real circuits, and hands-on label placement.
A standard residential permit set usually includes:
- A site plan
- A one-line diagram
- Product datasheets
- Structural documents
- Utility interconnection forms
Training should also cover the role of the Authority Having Jurisdiction (AHJ). The AHJ checks the work against the adopted code and any local amendments. When workers see how field work ties back to those documents – and how something like the wrong breaker size or a missing bonding jumper can delay permission-to-operate (PTO) – they start to treat compliance as part of the job, not office paperwork dumped on someone else. That same paperwork flows straight into inspection prep and commissioning.
Inspection Prep and Commissioning Steps
About 24% of residential rooftop PV projects fail inspection across 12 U.S. jurisdictions, and more than half of those failures come from work quality and code issues, not paperwork. In plain terms, a lot of failed inspections could have been avoided before the inspector ever showed up.
That’s why training should build a clear pre-inspection checklist into every project. Workers need to verify that the equipment and layout match the approved plans, confirm that labels are correct in text, location, and durability, and check torque on lugs, breakers, racking hardware, and grounding connections with a calibrated torque wrench and manufacturer torque tables. They should also document as-built conditions with photos, including roof layout, flashing, wire management, equipment nameplates, and service panel terminations. Real inspection failure reports and mock installs help a lot here. They train people to spot the stuff that gets missed when crews are tired, rushed, or just going on autopilot.
Commissioning works the same way: follow a set process and document what happened. The main steps are visual inspection, electrical verification, and functional testing.
- Visual inspection: Check that conductors are supported, insulation is intact, and terminations are torqued.
- Electrical verification: Confirm open-circuit voltage and short-circuit current against design targets, check polarity and continuity, and verify insulation resistance where needed.
- Functional testing: Start the inverter, confirm grid settings, record startup voltages and currents, verify monitoring communication, and make sure rapid shutdown works as intended.
Workers should complete a commissioning form with measured data, serial numbers, and test results. Those records don’t just sit in a folder. They make later troubleshooting much faster.
Preventive Maintenance and Troubleshooting
Once the system is energized, maintenance training gives workers more staying power than installation alone. A Rhode Island quality assurance study found that only 20% of 80 inspected solar installations met standards for safety, quality, expected performance, and conformance to stated specifications. So even when a system passes inspection, that doesn’t mean it will keep performing well if nobody checks it later.
Routine maintenance starts on the roof. Workers need to know how to spot cracked modules, broken glass, delamination, hot spots shown by discoloration, loose or rubbing cables, and damaged roof penetrations or flashing. Cleaning also matters, and the right method depends on U.S. conditions like hard water, dust, pollen, and snow. That means soft brushes, non-abrasive methods, fall protection, and no cold water on hot modules. NREL and IEA PVPS guidelines call for annual preventive maintenance on residential systems, with more frequent checks for larger commercial sites.
For troubleshooting, training should teach a set order: check monitoring first, then the inverter, then the DC side, then the AC side. Start with the least intrusive step and work toward the more invasive ones. Workers should know how to read inverter error codes, isolate strings with disconnects, and measure Voc and Isc to find a disconnected module or a mismatched string. On the AC side, they check breakers and verify voltage at the point of interconnection.
Any step that involves opening panels calls for lockout/tagout and arc flash awareness, with clear role-based limits on who can perform which tests. Workers who can do this well often move into service technician and crew lead roles, which usually come with higher pay and steadier work.
Compare Training Paths by Role and Career Stage
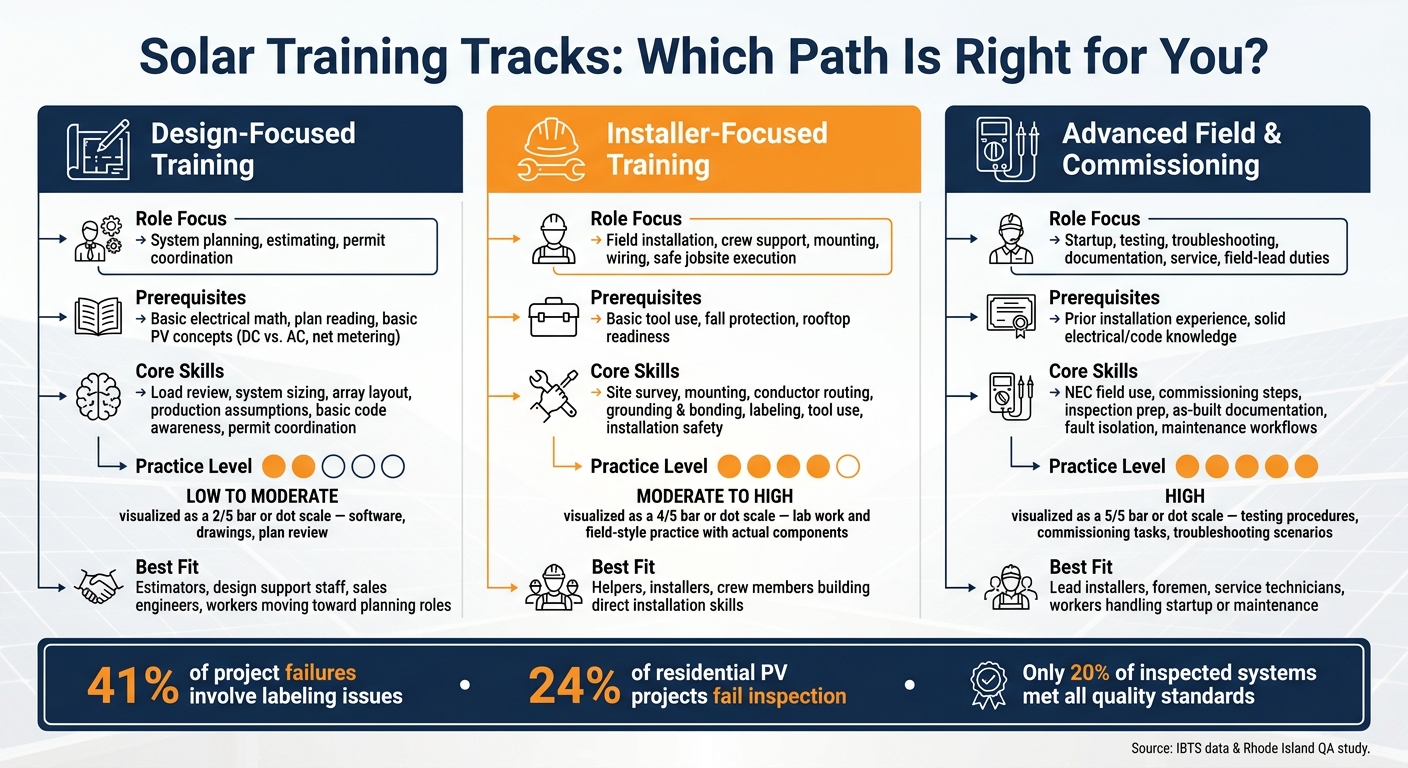
Solar Training Tracks Compared: Design vs. Installer vs. Advanced Field
Once workers can size, install, inspect, and maintain systems, training should branch by role and career stage. The table below shows how the depth of training changes as responsibility grows. Match the training path to the job before spending time or money.
| Training Track | Role Focus | Typical Prerequisites | Core Skills | Practice Level | Best Fit |
|---|---|---|---|---|---|
| Design-focused | System planning, estimating, permit coordination and plan review | Basic electrical math, plan reading, and a minimal understanding of PV concepts like DC vs. AC and net metering | Load review, system sizing, array layout, production assumptions, basic code awareness, permit coordination | Low to moderate; software, drawings, and plan review rather than full field assembly | Estimators, design support staff, sales engineers, or workers moving toward planning roles |
| Installer-focused | Field installation, crew support, mounting, wiring, and safe jobsite execution | Basic tool use, fall protection, and rooftop readiness | Site survey basics, mounting, conductor routing, grounding and bonding, labeling awareness, tool use, installation safety | Moderate to high; should include lab work and field-style practice with actual components | Helpers, installers, and crew members building direct installation skills |
| Advanced field and commissioning | Startup, testing, troubleshooting, documentation, service, and field-lead duties | Prior installation experience and solid electrical/code knowledge | NEC use in the field, commissioning steps, inspection prep, as-built documentation, fault isolation, maintenance workflows | High; should include testing procedures, commissioning tasks, and troubleshooting scenarios | Lead installers, foremen, service technicians, and workers handling startup or maintenance |
Design-Focused Training
This path moves away from day-to-day field work and into planning. It fits workers who spend more time in plans, drawings, and software than with tools and racking. Think estimators, design support staff, and sales engineers who need to size systems with accuracy, run energy modeling, place arrays on roof drawings, and pull permit packages together for the AHJ.
The field side matters here, but it is not the main focus. This path leans more on analysis, layout, and coordination.
Installer-Focused Training
This path is built around hands-on crew work. For most field workers, it is the starting point. OSHA-10 or OSHA-30 construction safety, fall protection, and NEC-based installation practices should be part of every hands-on exercise, not a separate module someone can skip.
This path also needs the most time in practice. A worker can read about mounting and conductor routing all day, but that only goes so far. Lab rigs that mimic a sloped asphalt-shingle roof or a small commercial flat roof give workers a much better feel for the job before they step onto an active site. Apprenticeship paths also fit well for workers aiming for lead installer or electrician roles.
Advanced Field and Commissioning Training
This path is for workers who already have installation experience. It adds electrical testing, commissioning procedures, and documentation skills used by lead installers, foremen, and service technicians. By this stage, workers should already be able to read one-line diagrams and use a multimeter safely.
For employers, certification checks matter most here. These are often the workers handling as-built documentation, getting projects ready for inspection, and working with the AHJ. Platforms like ABLEMKR can help solar employers verify that workers assigned to these duties have the right training and certifications before deployment, which can lower the risk of project delays.
Conclusion: What to Look for When Choosing Solar Training
After the full training path, the last test is simple: fit.
The best solar training follows the same sequence people deal with on the job: PV basics, sizing, layout, wiring, code, inspection prep, commissioning, and maintenance. It also needs hands-on labs that line up with those steps. If a program leans on theory and skips lab work, workers can finish class and still feel lost on site. And when code and inspection prep get left out, the result is often rework and failed inspections.
Job fit is the best filter. That’s why design-focused, installer-focused, and advanced field training should be judged against the actual tasks tied to each role. Installers need rooftop practice. Designers need sizing and planning. Mixing those paths too much can waste time and blur the skills each job calls for.
For employers, look for programs with documented lab hours, skills checks, and role-related credentials like NABCEP PV Associate or OSHA 10. ABLEMKR can help employers verify certifications and training history before deployment. That can speed up deployment and cut compliance risk.
For workers, start with the role you want. Then list the skills that role asks for and look for the shortest credible program that covers them.
Accreditation is also a useful quality signal. IREC/ISPQ accreditation adds a third-party check on curriculum, instructors, and equipment. The right program matches the job and shows that the worker can do the work.
FAQs
How do I choose the right solar training track for my role?
Choose a solar training track that fits your experience, career goals, and the role you want. If you’re new to the field, start with the basics: PV sizing, electricity fundamentals, and installation techniques.
If you want to move up, look for programs that line up with NABCEP standards. And if you’re aiming for utility-scale or more specialized work, focus on training in grid interconnection, battery storage, and safety topics like LOTO and fall protection.
What hands-on skills should a good solar training program include?
A good solar training program should blend classroom learning with hands-on practice.
That hands-on work should cover:
- AC and DC wiring, grounding, and bonding
- Mechanical installation, including system assembly, weatherproofing, and mounting
- Specialized tools and newer tech, such as battery storage integration
It should also include safety training for fall protection, lockout/tagout, and electrical hazards like arc flash and DC circuit risks.
Which code and inspection topics matter most in solar training?
The most important topics are the National Electrical Code (NEC), local building codes, and grid interconnection standards such as IEEE 1547. These shape safe, code-compliant work for conductor installation, grounding, bonding, and how the system connects with the grid.
For inspection prep, review permits, installation specs, maintenance logs, and OSHA safety rules such as fall protection and lockout/tagout.


