
If a robot cell shutdown is not controlled from start to finish, one missed lock, one open gate, or one skipped test can put people at risk. I’d treat this kind of audit as a five-part check: plan the outage, isolate all energy, control entry, restore guarding, and approve restart in writing.
Here’s the short version in plain English:
- Before the shutdown starts, I’d confirm drawings, cell IDs, risk records, work scope, crew approval, and training status.
- Before anyone enters the cell, I’d verify every energy source is locked out and the zero-energy state is checked and logged.
- During the outage, I’d track who enters and exits, confirm permits, and make sure temporary routes, barriers, and PPE rules stay in place.
- Before restart, I’d inspect fencing, interlocks, light curtains, mats, laser scanners, and E-stops, then run safety function tests.
- Before auto mode returns, I’d require written restart approval with dated sign-off from maintenance, operations, safety, engineering, and contractors when needed.
A few facts shape the whole process:
- OSHA lockout/tagout rules under 29 CFR 1910.147 apply to hazardous energy control.
- Robot cell guarding and safety checks tie back to ISO 10218-2 and ANSI/A3 R15.06.
- The audit record should track 100% of isolation points, entry logs, test results, and restart approvals for the outage.
What matters most is simple: no entry without isolation, no restart with open issues, and no handoff based on a verbal “go.”
This article lays out those checks in the order I’d want to see them during a shutdown audit.
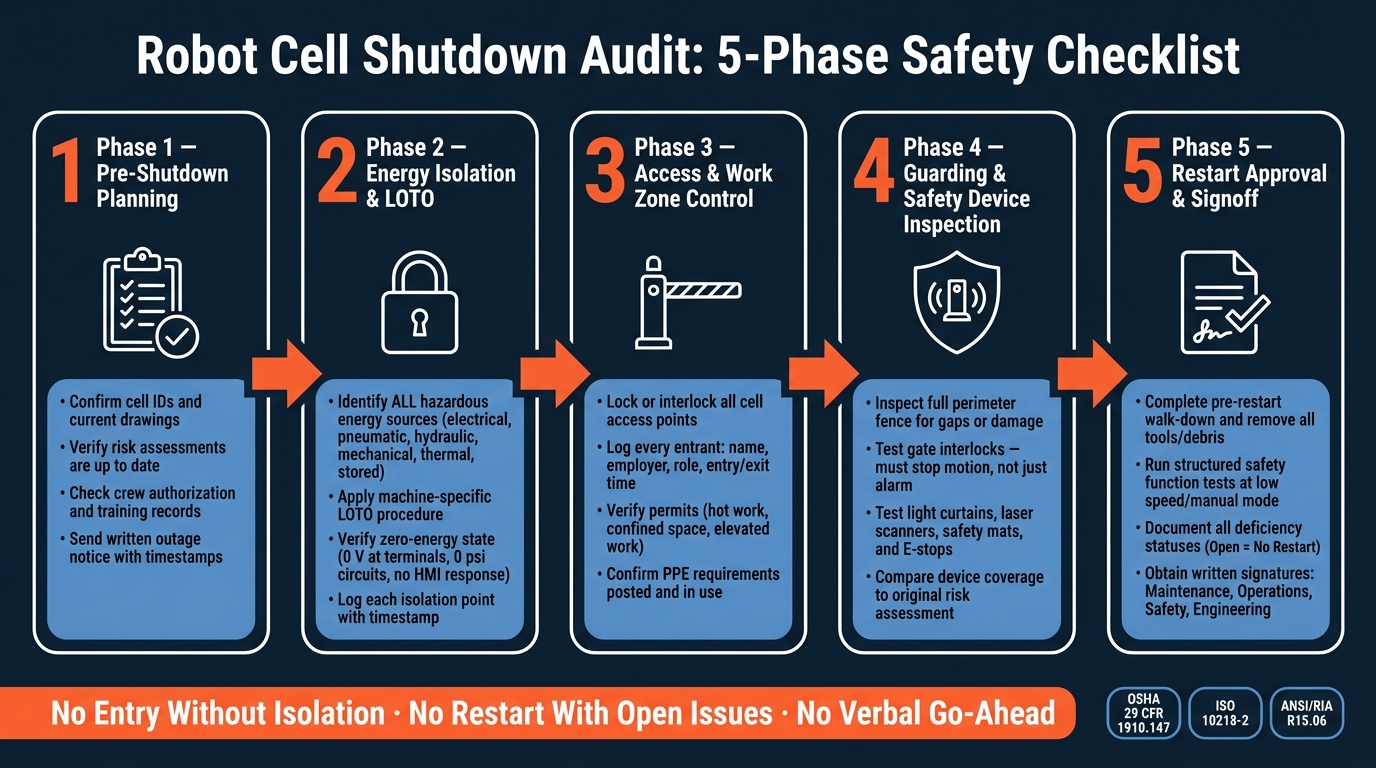
Robot Cell Shutdown Audit: 5-Phase Safety Checklist
LOGOUT TAGOUT PROCEDURE ON ROBOTIC CELL
sbb-itb-aa28329
Pre-Shutdown Planning Checklist
Before anyone starts isolation, lock down the basics: documents, scope, crew approval, and outage timing.
Confirm Cell Documents, Asset IDs, and Risk Records
Give each robot cell its own cell ID and use that ID on every outage record. That sounds simple, but it saves a lot of back-and-forth once the shutdown starts.
Check that these documents are current before isolation:
| Document | What to Verify |
|---|---|
| Mechanical and electrical drawings | Revision number matches what’s physically installed |
| One-line diagrams | Power and control circuits match the installed system |
| Cell layout drawing | Guarding, access points, and e-stops match field conditions |
| Risk assessment | Current, or updated after cell changes |
| Equipment labels | Each robot, controller, safety PLC, and major component is tagged and matches the asset register |
Then compare each item to what’s actually in the field. If the paperwork and the installed setup don’t match, the LOTO plan can fall apart and restart testing can get pushed back.
Verify Scope, Crew Authorization, and Training Status
Once the scope is set, make sure only qualified workers are assigned to the shutdown.
The shutdown scope document should list every asset being touched, grouped by category:
- robots
- controllers
- end effectors
- conveyors
- fixtures
- guarding
It should also spell out what is not in scope. That matters. If adjacent equipment isn’t included, crews shouldn’t have to guess.
Only authorized employees may perform LOTO tasks. Check current training records and written authorization before the outage begins.
For contractors, verify certifications and training before arrival. ABLEMKR can help coordinators filter pre-vetted workers by certification, safety training, and outage availability.
Align Outage Timing and Communication Before Isolation Starts
Send a written outage notice with the cell ID, the reason for the outage, and the start and end times in U.S. format. For example: Start: 10/15/2026 11:00 PM; End: 10/17/2026 5:00 AM. Share it with all affected teams and log who received it.
If the schedule changes, record the update with a new timestamp and resend it through the same channels.
Once the outage is scheduled and shared, move to isolation, access control, and work-zone control.
Isolation, Access, and Work Zone Control Checklist
Once outage timing is set, the next step is simple: make sure the cell is under physical control before anyone goes in.
Three things have to be in place at the same time:
- Energy is fully controlled
- Access is tracked
- The work zone is clearly marked
If one fails, the other two won’t save the situation.
Check Energy Isolation Points and LOTO Verification
Before work starts, identify and document every hazardous energy source feeding the cell. Under OSHA 29 CFR 1910.147, that includes electrical, pneumatic, hydraulic, mechanical, thermal, and stored energy. It also includes springs, accumulators, and elevated loads that can release energy even after main power is shut off.
Incomplete de-energization and lockout failures cause most machine-related fatalities. That’s why every energy source needs to be isolated before entry.
The cell’s machine-specific LOTO procedure should list each isolation point, along with its asset ID, the type of lock used, and the name of the authorized employee who applied it. After locks are installed, auditors should confirm zero energy in a way that can be checked, not guessed. That means:
- measuring voltage at terminals with a calibrated meter
- bleeding pneumatic and hydraulic circuits down to 0 psi
- attempting a start from the HMI or teach pendant and confirming there is no robot movement
Each step should be logged with a timestamp.
Every contractor should use their own verified lock, and that lock should appear on the isolation record.
After isolation is confirmed, shift to entry control and work-zone tracking.
Review Access Logs, Gate Control, and Contractor Sign-In
Once isolation is in place, control who gets inside.
Every access point to the cell should be locked or interlocked so opening a gate or door cannot allow robot motion. Auditors should physically inspect interlocks and make sure no one has defeated them with jumpers, tape, or magnets.
The cell sign-in log should record the full name, employer, job role, task, entry time, and exit time for every person entering the work zone. Auditors can compare that log against work orders and permits. If a contractor signed in at 10:00 AM for hot work, there should be a valid hot work permit for that time and location. Missing exit times or names that don’t match any permit are red flags.
| Audit Check Category | Specific Records to Verify |
|---|---|
| Personnel Authorization | Trade licenses, LOTO training records, and site-specific safety certifications |
| Access & Entry Logs | Contractor sign-in/out sheets, entry times, exit times, and permit-required entry logs |
| Contractor Oversight | Master Services Agreements (MSAs), insurance certificates, and subcontractor license renewals |
After access is controlled, check that the work zone is marked, staffed, and permitted the right way.
Verify PPE, Permits, and Temporary Work Controls
Post task-specific PPE rules at the cell entry point and confirm crews are wearing them. Grinding, hot work, and chemical cleaning may require face shields, flame-resistant (FR) clothing, or respiratory protection.
Permits matter most when the task brings extra risk. Hot work, confined space entry, elevated work, and temporary guard removal each need their own permit with documented controls. For temporary guard removal, the permit must spell out alternate safeguards, such as reduced robot speed, defined safety zones, or direct supervision. It also must require full guard restoration before restart.
If a permit calls for a fire watch and a portable extinguisher at the robot cell, both should be physically present when the auditor checks the area.
Temporary work-zone controls should make the area easy to understand at a glance. Portable barriers, clear signs, task lighting, and open access paths should define the space. Every route into the shutdown area should pass a barrier or sign. Emergency egress routes must stay open and marked during the outage, especially when several contractors are working at the same time during a turnaround.
Guarding, Safety Devices, and Restart Approval Checklist
With energy isolated and the work area under control, the next step is to check the cell’s guards, safety devices, and restart readiness. Follow this sequence: guarding first, then the pre-restart check, then formal approval.
Inspect Guarding, Interlocks, and Presence-Sensing Devices
Start with the full perimeter fence. Check for loose panels, missing fasteners, bent posts, cut mesh, or openings large enough for a hand or foot to pass through. If an opening creates a reach-through path to a hazard zone, fix it before restart. Under OSHA 29 CFR 1910 Subpart O and ANSI/RIA R15.06, guards must block access to the danger zone. They can’t just make access less likely.
Next, inspect gates and interlocked doors. Open each gate and make sure hazardous motion stops. The interlock must stop motion, not just trigger an alarm. Also check that no one has bypassed the switch with tape, a magnet, or a jumper wire in the safety circuit. If the cell uses trapped-key systems, review those at the same time.
Test each device based on what it’s supposed to do. Light curtains need beam alignment checked across the entire protected zone, and a test should show that breaking any single beam stops hazardous motion at once. Laser scanners should match their documented protective field settings. Safety mats need a walk-test across every zone. After each test, compare the device’s mounting position and coverage with the original risk assessment and the cell layout. If shutdown work changed the guarding layout, review it again before restart.
Then press every E-stop in and around the cell. Make sure the robot comes to a full halt, the circuit shows no bypasses or jumpers, and each device is easy to access and clearly labeled.
Once the guarding and safety devices pass, move to the pre-restart walk-down.
Complete Pre-Restart Inspection and Safety Function Testing
Before energizing anything, walk through the cell and remove all temporary equipment, tools, debris, and loose hardware. Floors should be free of oil spills or scrap that could affect sensors or interfere with robot travel paths.
After the area is clear, confirm that all guards, panels, and access covers are back in place with the correct fasteners and properly secured. Then run a structured safety function test before full energization. Start at low speed or in manual mode, and check each safety layer.
| Safety Function | Test Method | Required Outcome |
|---|---|---|
| Gate interlocks | Open each gate in auto mode | Robot stops; cannot restart until gate is closed and reset |
| Light curtains | Break any beam in the protected zone | Immediate stop; no restart until field is clear and reset |
| Laser scanners | Enter the warning and danger zones | Speed reduction, then safe stop on zone intrusion |
| Safety mats | Walk across all mat zones | Timely stop response on every mat section |
| Emergency stops | Press each E-stop | Full halt within rated stopping time; no bypasses present |
Record the result of each test, along with the date, time, equipment ID, and tester name. If anything fails, restart stops until the issue is fixed and the test is run again.
If any test fails, stop here and document the correction before signoff.
Require Formal Restart Approval and Final Signoff
A robot cell should never go back to automatic operation on a verbal go-ahead. Restart approval needs to be written down, and it should be signed before the main disconnect is released.
The approval record should include the work completed during the shutdown, confirmation that all LOTO devices were removed according to procedure, guard and safety device restoration status, safety test results, and any open deficiencies with their interim controls. Here’s how deficiency status affects restart:
| Deficiency Status | Requirement for Restart |
|---|---|
| Open | Restart prohibited – hazard identified but not addressed |
| In Progress | Restart prohibited – mitigation still underway |
| Pending Verification | Restart restricted – work finished, awaiting safety function test |
| Closed | Restart permitted – deficiency corrected and verified |
Required signatures usually include the maintenance supervisor, operations supervisor, and a safety or engineering representative. For multi-contractor shutdowns, include a contractor representative sign-off too. The completed form should be logged in the plant’s work management or EHS system so it can be searched by asset ID and outage date.
For multi-contractor shutdowns, ABLEMKR can help track worker status, certifications, and safety training before signoff.
Shutdown Audit Logs, Closeout, and Key Takeaways
Record the Audit Trail for Future Outages
Once the cell is cleared for restart, close the outage with a full audit packet. This record matters for inspections, investigations, and planning the next outage.
At a minimum, include the cell ID, cell location, outage or work order ID, and the procedure version used. The packet should also log energy isolation details for each source, including:
- the isolation point
- the device applied
- who applied it
- the verification result that confirmed the zero-energy state
You should also record crew sign-on and sign-off timestamps, guarding and safety device status before and after work, any deficiencies found with the corrective actions taken, and the final restart approval with signatures and date/time in U.S. format. When you tie the record back to the main controls in this article – isolation, access, guarding, and restart approval – the packet becomes much more useful during a later review.
Store the audit trail in your CMMS or EAM so teams can filter records by cell ID, outage date, or deficiency type. Keep those records based on site policy and any regulatory rules that apply.
Use Findings to Improve the Next Shutdown
After the record is stored, go back through it and look for repeat failures or weak spots. The point isn’t just to file paperwork. It’s to catch patterns before they show up again.
Classify each finding as a documentation, hardware, human, or procedure issue. Then assign an owner and due date. For example, a bypassed interlock may call for tamper-resistant hardware along with focused training on the risks of defeating safety devices. If procedures are out of date, that should trigger a formal revision and recorded worker training on the new version.
Before the next outage, hold a pre-shutdown review meeting. Use that meeting to fold lessons from the last turnaround into the new scope, staffing plan, and training plan. Then carry those corrections straight into the next shutdown plan.
Conclusion: Key Robot Cell Shutdown Checks
A safe robot cell shutdown comes down to a few non-negotiable checks:
- verify documents and risk records before work starts
- control every hazardous energy source and confirm the zero-energy state
- track access and contractor activity
- confirm guarding and safety device status before and after work
- test safety functions before returning the cell to automatic operation
- require written restart approval with signatures
Miss one step, and you leave a gap in protection and in the record itself.
FAQs
Who should sign the restart approval?
The restart approval should be signed by the person assigned to that task in your project’s Compliance Responsibility Matrix.
A RACI framework helps make that clear. It shows who gives input, who owns completion, and who checks that safety requirements are met before work starts again.
These approvals should also be documented digitally and kept as audit records. That creates accountability and gives you a clear paper trail for future regulatory reviews.
What counts as a zero-energy check?
A zero-energy check confirms that equipment is fully disconnected from every energy source: electrical, mechanical, hydraulic, pneumatic, chemical, thermal, and gravitational.
It involves isolating those sources and applying lockout/tagout, releasing any stored energy, and then trying the normal controls to make sure the equipment will not restart. Before maintenance begins, workers also use calibrated instruments to verify that no residual energy remains.
What should be included in the shutdown audit record?
A shutdown audit record should include:
- Isolation and lockout/tagout records
- Contractor sign-in logs and workforce data, including verified certifications, safety training, and site-specific orientations
- Incident investigations, near-miss logs, corrective action status, environmental records, access and outage logs, equipment inspections, and job hazard analyses
Each record should be timestamped, supported by digital audit trails, and grouped by regulatory category so inspection reviews are easier and faster.


