
A grid battery can still burn, vent gas, or shock workers even after shutdown. If I had to boil this article down to the few steps that matter most, I’d say this: lock out every power source, separate damaged units at once, pack each battery the right way, and do not ship anything until the paperwork and sign-offs match the load.
Here’s the short version in plain English:
- Start with planning and lockout/tagout. I make sure the job scope, low state of charge target, PPE, exclusion zones, and emergency contacts are set before anyone touches the system.
- Verify zero energy. That means shutdown, isolation, locks and tags, a try-step, and live-dead-live testing with recorded readings.
- Inspect every module. I look for swelling, leaks, corrosion, burn marks, wiring faults, and BMS alarms.
- Pull damaged or suspect batteries out of the normal path. Those units need marked staging, fire watch, leak control, and close observation.
- Package to stop short circuits and movement. I cover terminals, use non-metal inner packaging, add non-conductive filler, and use stronger UN-rated packaging for damaged batteries.
- Store with controls in place. Keep containers cool, dry, ventilated, away from heat and fuel, with access limits and inspection logs.
- Check shipping rules before release. In the U.S., batteries may fall under OSHA, EPA/RCRA, DOT/PHMSA, NFPA 855, and local fire code rules at the same time.
- Finish with worker sign-off and records. The electrical worker, EHS or hazmat lead, and site supervisor should all confirm the load is ready to leave.
A few numbers stand out. Universal waste shipments must move within 12 months of the accumulation start date, records should stay on file for at least 3 years, and EPA civil penalties can reach $70,117 per day, per violation if the job is handled the wrong way.
If you want one takeaway, it’s this: battery disposal is not just removal work. It is a controlled safety job with electrical, fire, waste, and transport rules all tied together.
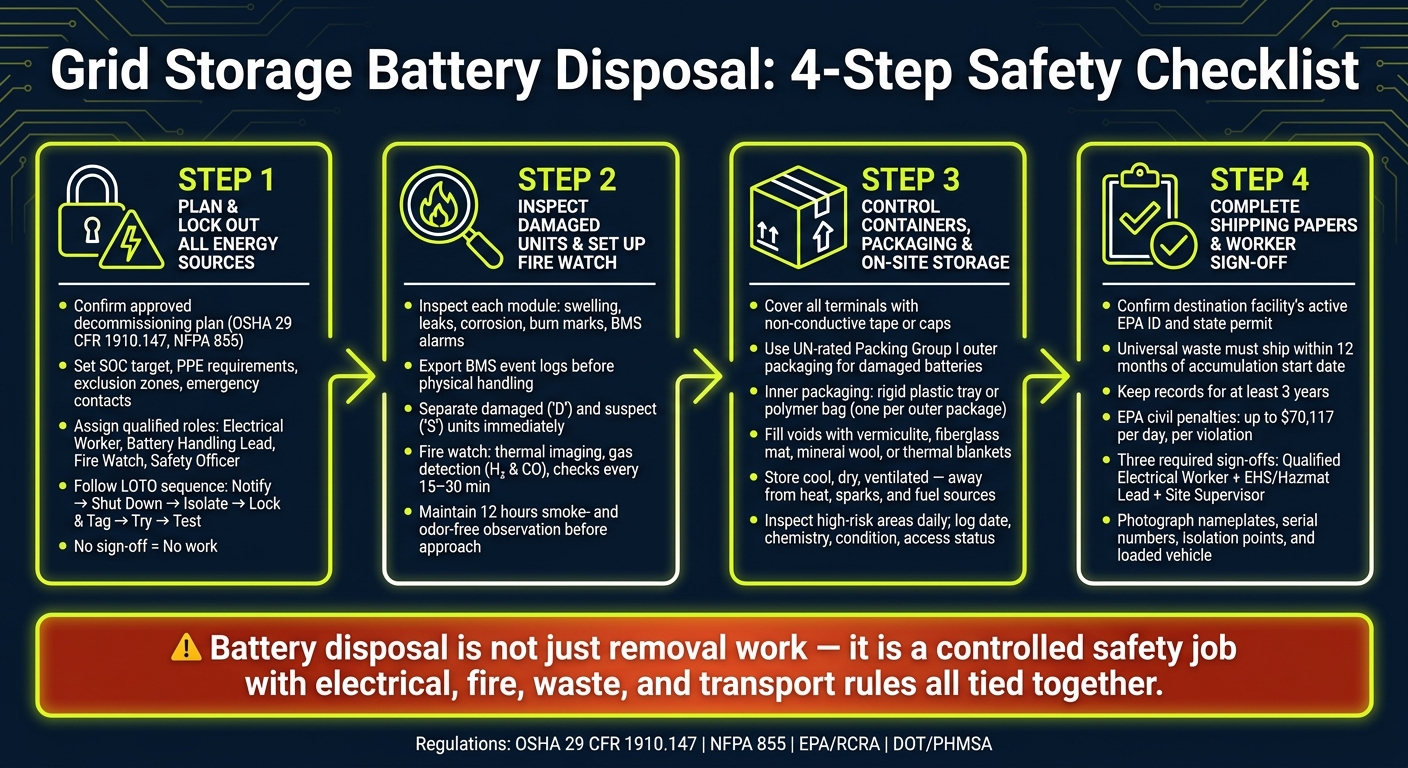
Grid Storage Battery Disposal: 4-Step Safety Checklist
Battery Collection Safety Training for Solid Waste Facilities (2023)
sbb-itb-aa28329
Step 1: Plan the Job and Lock Out All Energy Sources
Don’t start physical battery removal until every energy source has been checked and confirmed de-energized. Planning and LOTO come first. Battery removal comes after that.
Pre-Disposal Planning Checks
First, confirm you have an approved decommissioning plan following OSHA 29 CFR 1910.147, NFPA 855, and the manufacturer’s LOTO instructions. That plan should spell out the full scope of the job, including battery modules, strings, inverters, the DC bus, auxiliary power equipment, and control systems, so no energy source gets missed.
Before the crew gets to the site, check these items:
- State of charge (SOC) target: Bring the system down to the lowest safe SOC before removal. A lower SOC means less fault energy, which can reduce how severe an incident could be.
- PPE requirements: Arc-rated clothing, voltage-rated gloves, insulated tools, eye and face protection, and chemical-resistant gloves where electrolyte exposure is possible.
- Exclusion zones: Set and mark hot, warm, and cold zones with barriers and signage. Only qualified electrical workers should enter the hot zone.
- Emergency contacts: Post 24/7 contact numbers for the fire department, utility/grid operator, AHJ, and site emergency coordinator.
Anyone handling electrical isolation or battery removal must be a qualified person with training for the site’s voltage levels and battery type. Put roles in writing: Responsible Electrical Worker, Battery Handling Lead, Fire Watch, and Safety Officer.
Lockout/Tagout Verification Steps
Use OSHA 29 CFR 1910.147 and NFPA 855 together. Follow the sequence below and document each step.
- Notify: Inform all affected personnel, the utility/grid operator, and the AHJ that isolation work is starting.
- Shut down: Use manufacturer-approved procedures to shut down the BESS, including inverter and controller shutdown. At the same time, confirm that critical support systems like fire detection and suppression stay operational.
- Isolate: Isolate from the highest-energy source to the lowest-energy source. Start at the AC point of interconnection to the grid, then move to DC strings, then individual battery modules, then control power and auxiliary circuits.
- Lock and tag: Apply a lock and tag to every energy-isolating device. Each tag must show the worker’s name, date, reason, and contact number.
- Try: Attempt to start or energize the system to verify that it cannot restart.
- Test: Use a properly rated, calibrated tester that has been verified on a known live source before and after use. Test phase-to-phase and phase-to-ground at each test point, and record every reading.
If you’re dealing with a complex battery bank where full de-energization isn’t possible, sectionalize the strings by removing identified busbars or intercell connectors. Tag each removed component "REMOVED FOR SECTIONALIZING" and secure it so it can’t be put back in place by mistake. The Responsible Electrical Worker must sign off on all isolation points before battery removal begins. No sign-off, no work.
Once the Responsible Electrical Worker signs off, inspect damaged units and activate fire watch controls.
Using ABLEMKR to Assign Qualified Crews
ABLEMKR helps assign pre-vetted workers by certification, training, availability, and location, while tracking compliance and sign-off. That staffing support helps back up the required sign-off before moving to the next step.
Step 2: Inspect Damaged Units and Set Up Fire Watch Controls
Once LOTO sign-off is complete, inspect each module before any packaging or movement starts.
Damaged Battery Assessment Checklist
Check every battery module one by one. Record the module ID, location, date and time in MM/DD/YYYY format, inspector name, and any temperature or deformation readings in U.S. customary units.
For each unit, inspect and document:
- Swelling, bulging, punctures, dents, or enclosure deformation
- Leaks, residue, corrosion, soot, or smoke staining
- Heat damage, tripped breakers, blown fuses, burned insulation, or wiring faults
If the BMS is still working, export the event logs before any physical handling begins. Review alarms for high cell temperature, over-voltage, under-voltage, over-current, insulation resistance faults, and gas detection triggers. Any string in fault lockout state should be handled as damaged and isolated for more evaluation. Confirm SOC for each unit as well.
Separate damaged and intact units right after inspection.
Any unit with swelling, leaking, venting, corrosion, or signs of prior fire must be taken out of the routine-disposal path at once. Treat unresolved BMS faults the same way and isolate those units for more evaluation. Move the unit to a clearly marked "Damaged/Suspect – Special Handling" staging zone, limit access to qualified personnel only, and record its condition code – "D" for damaged or "S" for suspect – on both the physical tag and the inspection log. Send intact units to routine-disposal staging.
Tag any damaged or suspect unit for fire watch before it moves to packaging.
Fire Watch and Emergency Readiness
Damaged batteries can vent gas and catch fire later, not just right away. Because of that, fire watch needs to stay active during handling.
Assign trained personnel whose only job during active handling is to watch for smoke, odor, heat, and gas alarms.
During active handling of damaged units, the fire watch plan should include:
- Thermal imaging scans at set intervals to spot hot areas and confirm surface temperatures have dropped to safe handling levels in °F
- Portable gas detection for hydrogen and carbon monoxide, based on the site hazard analysis
- Documented checks every 15–30 minutes during any post-work observation window, with time-stamped log entries
- Maintain 12 hours of smoke- and odor-free observation before approach or disassembly
Before any high-risk handling starts, confirm that all extinguishing resources listed in the site’s emergency response plan are present, working, and easy to access. That includes portable extinguishers, hose stations, and any fixed suppression systems tied to the ESS. Place absorbent pads, berms, or trays under damaged units to control possible electrolyte leaks and fire-water runoff. Keep access routes to the damaged-battery staging area clear at all times. Also keep documented escalation contacts ready for OEM technical support and local emergency responders if conditions get worse.
Only units that stay stable through the observation period should move on to container controls and on-site storage.
Step 3: Control Containers, On-Site Storage, and Packaging
After inspection, separate damaged units from intact units and pack each one for the right storage path. This is temporary accumulation, not final storage. The battery’s condition sets the packaging level: intact units stay in routine staging, while damaged units go into reinforced packaging.
Container and Packaging Checklist
If you’re sending damaged or defective lithium batteries off-site for disposal or recycling, use UN-rated outer packaging that meets Packing Group I performance, with one inner package per outer package and clear damaged-battery markings.
For intact units moved internally on-site, sturdy fiberboard, plastic, or metal containers are allowed. If you use metal, line the container with a non-conductive material so the battery can’t touch bare metal.
Before any battery goes into a container, protect all exposed terminals, bus bars, and lugs with non-conductive tape, caps, or rigid plastic covers. Then place each battery in its own non-metallic inner packaging, such as a rigid plastic tray, polymer bag, or plastic box, so it can’t contact other batteries or the container wall.
Fill empty space with non-conductive, non-combustible cushioning. Common options include:
- Vermiculite
- Fiberglass mat
- Mineral wool
- Thermal insulation blankets
These materials help keep the battery stable and cut down contact risk during handling and storage.
For leaking units, add enough inert absorbent material to contain any electrolyte. Also, keep damaged and intact batteries separated at all times.
On-Site Storage Controls
Store all battery containers in a cool, dry, well-ventilated area away from direct sunlight, heaters, welding stations, flammable liquids, oxidizers, and compressed gases. In plain terms, don’t stage them anywhere heat, sparks, or fuel sources can pile up into a bad day.
Post restricted-access and no-smoking signs, and keep aisles open for emergency access. Damaged-battery containers should stay in a restricted sub-zone with close monitoring.
Track each container by:
- Date
- Chemistry
- Condition
- Access status
Inspect high-risk areas daily and general storage areas weekly. Record stack limits and any corrective actions in the log.
Once containers are logged and staged, complete shipping papers and transport checks before release.
Step 4: Complete Shipping Papers, Final Checks, and Worker Sign-Off
Once storage controls are done, check the transport documents before any load leaves the site.
Shipping Papers and Transport Compliance
Match the waste classification, Class 9 labeling, and shipping papers to the actual load. If the paperwork says one thing and the containers say another, stop the release.
A few checks matter most:
- Confirm the destination facility’s active EPA ID and state permit before shipment.
- Track universal waste deadlines: batteries must move to a permitted facility within 12 months of the accumulation start date .
- Keep shipping records, delivery receipts, and recycling certificates for at least three years .
This isn’t just admin work. If batteries are classified the wrong way, or if accumulation limits are missed, the EPA can issue civil penalties of up to $70,117 per day, per violation.
Don’t load the vehicle until the paperwork lines up with the container inventory.
Worker Sign-Off and Digital Recordkeeping
Sign-off is the last checkpoint. It closes the loop on isolation, waste classification, and load security. Before release, three roles need to confirm the job is done:
- Qualified Electrical Worker: isolation complete, voltage absent, SOC at or below 30%.
- EHS/Hazmat Lead: waste class, packaging, and labeling compliant.
- Site Supervisor: serial numbers match, load secure, site restored.
Each record should include the person’s full name, role, date, and time in U.S. format. Also document the physical evidence: photograph nameplates, serial numbers, isolation points, and the final loaded vehicle so you have a full compliance record.
Then pull the handover pack together. That pack should include marked-up drawings, isolation records, photographs, serial-number disposition, damage reports, and signed transport receipts.
ABLEMKR tracks worker qualifications and task sign-offs so only qualified personnel handle these high-stakes safety steps.
Conclusion: The Non-Negotiable Disposal Steps
No load leaves the site until the paperwork, signatures, and transport controls all match the shipment.
FAQs
Who can sign off on battery disposal?
Only qualified personnel with the right safety training and current certifications should sign off on battery disposal.
Grid storage batteries are hazardous materials. So the person approving disposal needs to know the federal and state rules that apply, including EPA and DOT requirements. Employers should also keep clear, audit-ready records that show those qualifications.
What makes a battery damaged or suspect?
A battery is considered damaged or suspect when it shows clear physical or performance warning signs. That can include swelling, bulging, deformation, unusual odors, Battery Management System alarms, voltage swings, or sudden temperature spikes.
It may also be treated as suspect after an incident, even if the damage isn’t obvious at first. For example, a battery should be flagged if it has been punctured, dropped, exposed to heavy vibration, or if there are signs of corrosion or leaks around the enclosure.
When should a battery shipment be stopped?
Stop a battery shipment if it fails to meet regulatory requirements. That includes improper labeling, missing documentation, or the wrong state of charge for the transport mode.
You should also halt the shipment if any units are damaged or defective, or if hazardous material handling or safety procedures aren’t being followed.
That pause matters. It helps prevent serious risks like electric shock, thermal runaway, or reignition.


