
If crews are not trained before work starts, reuse goals can fail on day one. In the U.S., construction and demolition created about 600 million tons of debris in 2018, and most of it came from demolition. My takeaway is simple: I need crews to know what to save, how to handle it, where to sort it, and what to record before the first cut.
Here’s the whole article in plain terms:
- Start with the job goals. I explain the project’s reuse, recycle, and disposal rules in simple language.
- Assign each person’s role. I make it clear who tags, removes, moves, and logs materials.
- Check safety first. I verify fall protection, electrical risks, dust controls, sharp-edge risks, PPE, and lift plans.
- Protect salvage during removal. I train crews to inspect items in place, avoid damage, and move materials with the right tools.
- Sort materials right away. I use labeled streams for reuse, recycle, special waste, and landfill.
- Inspect tools and equipment. I check hand tools, lifting gear, forklifts, lifts, and lockout/tagout awareness before use.
- Set up records before work begins. I make sure the inventory log, salvage plan, waste plan, chain-of-custody notes, and material forms are ready.
- Verify every worker. I confirm ID, training, task approval, PPE, and site-rule sign-off before anyone starts.
- Use a go/no-go check. If training, tools, handling rules, or records are missing, I stop work until the issue is fixed.
At its core, this checklist is a day-one control tool. It helps me cut waste, avoid damage to reusable materials, and keep records ready for owner review and closeout.
The rest of the article walks through those checks in the order I’d use them on a U.S. jobsite.
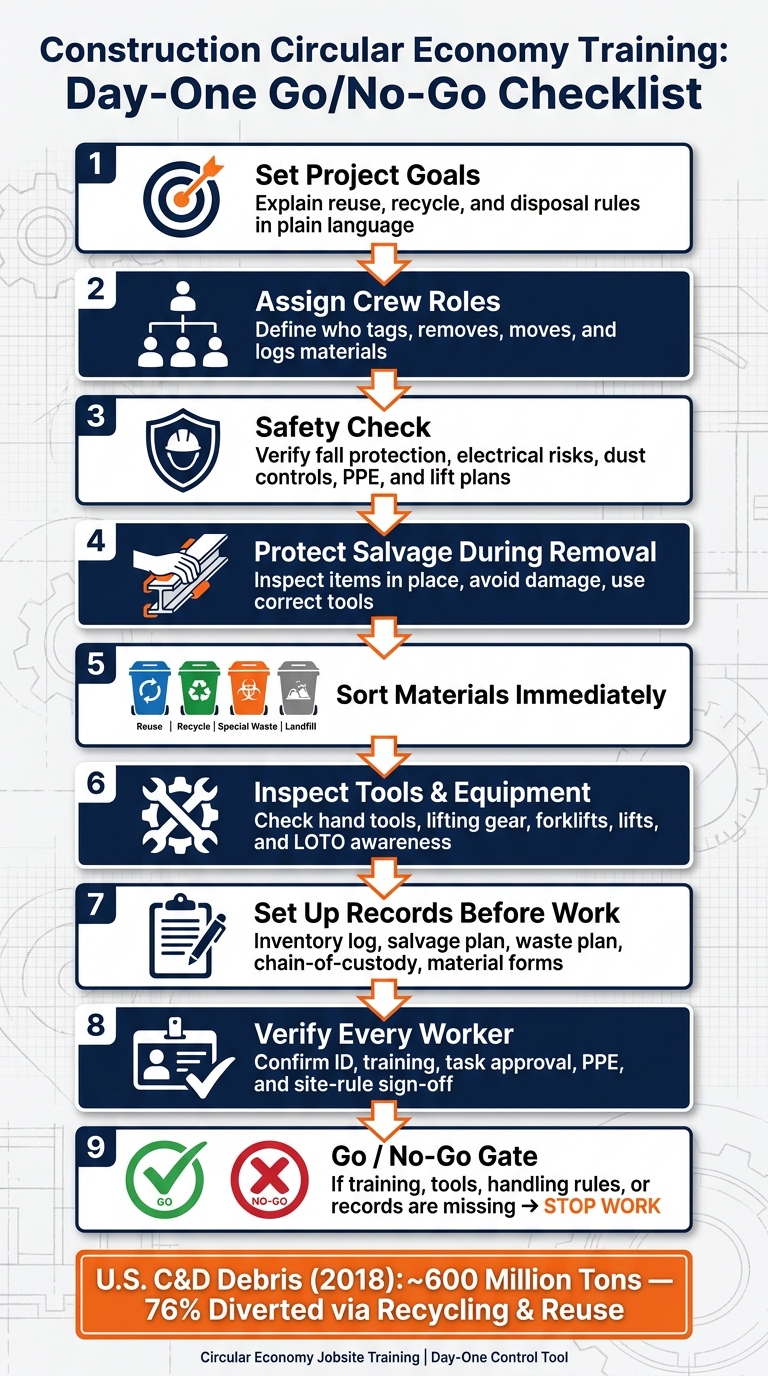
Construction Circular Economy Training Checklist: Day-One Go/No-Go Process
1. Circular Economy Basics for Crew Onboarding
Start with one simple rule: reuse first, recycle second, dispose last. That order should guide every move on a circular jobsite, from how a beam is cut to where a removed door is set down. Crews need to understand how that rule changes daily work. Planned deconstruction is a step-by-step removal of building parts. It is not demolition done in a hurry. Before each shift, turn that rule into clear task instructions people can follow on the spot.
Explain the Project’s Circular Goals
Each project has its own material priorities, and crews need to hear them in plain language before work begins. At onboarding, supervisors should walk everyone through a simple materials playbook that shows what goes where:
- Items for reuse, such as structural steel sections, heavy timbers, interior doors, and lighting fixtures
- Items for repair or refurbishment, such as HVAC units and electrical panels
- Items for recycling, such as scrap metal, clean concrete, and copper wiring
- Items that must be handled as waste due to safety or code rules, such as asbestos-containing materials and lead-painted surfaces
When crews know those priorities, they’re less likely to damage materials and more likely to sort them the right way. Visual aids make a big difference here. Color-coded diagrams or photos of common assemblies with clear "reuse", "recycle", and "waste" labels for that project help people make the right call in the field. Supervisors should also repeat the day’s main focus at the start of each shift, like prioritizing structural steel salvage in a certain grid zone.
Once the material path is clear, assign who tags, moves, and logs each item.
Define Crew Responsibilities by Task
Use a task matrix to show who tags salvage, who approves removal, and who records quantities and destinations. Every worker should know their part in the salvage workflow before demolition or material movement starts.
Check credentials before assigning salvage, deconstruction, or abatement work. Anyone in those roles should complete the required site-specific orientation and hold the site-required safety and environmental credentials before starting. Post the task matrix in the site office and review it during toolbox talks so people stay on the same page and no one has to guess once the work begins.
With goals and roles set, the next step is safety checks and handling controls before the first cut.
sbb-itb-aa28329
2. Safety, Material Handling, and Equipment Checks
Before work starts, check hazard controls, salvage handling, and equipment status. Do that before the first cut, lift, or removal.
Jobsite Safety Checks for Deconstruction and Salvage
Go over fall, struck-by/caught-in-between, electrical, dust, sharp-edge, and collapse hazards tied to each salvage task.
Fall protection applies at 6 ft or more above a lower level. Workers need to know when to use guardrails, personal fall arrest, or fall restraint. They also need to show they can put on a harness the right way and connect it to an approved anchor.
Struck-by and caught-in/between hazards matter most during component removal. That means setting exclusion zones around equipment, using spotters for forklifts and telehandlers, and following a safe removal sequence so parts don’t shift or bring down nearby sections.
For electrical awareness, workers need to spot live conductors, keep minimum approach distances, and coordinate with qualified electricians before touching any building system marked for salvage.
Cutting or grinding concrete creates respirable silica. When the task calls for it, workers need respirators, plus training on wet methods or local exhaust ventilation. Sharp edges are another day-to-day risk, especially from de-nailed lumber, broken glass, and exposed metal framing. Partial demolition areas can also move without warning, so explain temporary bracing rules before anyone enters those zones.
PPE checks should go past simply handing out gear. Confirm baseline PPE first:
- Hard hats
- Safety glasses
- High-visibility vests
- Work gloves
- Safety-toed boots
Then have each worker show they can inspect their harness, confirm respirator fit testing when it’s required, and point out when cut-resistant gloves or hearing protection are needed based on the task and posted noise zones. After that, collect a PPE sign-off showing each worker received, inspected, and knows how to use their assigned PPE.
Once hazards are covered, make sure the crew can move salvage without wrecking its value.
Material Handling and Salvage Procedures
Salvaged materials keep their value only if crews handle them the right way from the moment they come out. Train workers to inspect reusable components in place before removal. For salvaged lumber, that means checking for rot, warping, and embedded fasteners. For steel components, check for severe rust or deformations. If an item is damaged, flag it before moving it.
Safe lifting and load stability aren’t optional. Workers should check load weight and center of gravity, use team lifts for heavy or awkward items, and grab mechanical aids like dollies, pallet jacks, or carts whenever a solo lift goes past roughly 50 lb.
Stacked materials such as doors, windows, and lumber should be placed on level surfaces, kept below shoulder height, and secured with chocks, bands, or restraints. Clear one-way transport routes from deconstruction zones to storage areas help cut struck-by risk and keep the material stream in order.
Crews also need to sort waste from the start. Workers should know the four site categories and where each one goes:
- Reuse
- Recycle
- Hazardous/special waste
- Landfill
Color-coded bins and clearly marked roll-off containers make the right choice easier. If an item falls into a gray area, the rule is simple: ask a supervisor before throwing it out.
Tool and Equipment Readiness
Require pre-use inspection of hand tools, power tools, and lifting gear. If something is damaged, take it out of service.
For lifting equipment like slings, chains, straps, and hoists, workers need to check for cuts, abrasion, broken links, missing load-rating tags, and bent parts. They should also inspect manual and powered lifting aids for leaks and working brakes. On high-risk deconstruction days, supervisors should require documented inspections at the start of each shift.
Lockout/tagout (LOTO) awareness is required for everyone on site, not just authorized employees. Workers need to know who is allowed to de-energize systems, how to spot locks and tags on control points like breaker panels and valve handles, and that they must never remove a lock or restart tagged equipment.
On circular projects, this point matters even more. HVAC units, switchgear, and other building systems set aside for reuse must be confirmed de-energized by authorized personnel before anyone dismantles, moves, or tests them.
Before anyone uses forklifts, aerial lifts, or telehandlers, require documented training, a hands-on evaluation, and supervisor authorization. Only after that should equipment be assigned to the crew.
Once these checks are complete, record the required training and accountability items.
3. Documentation and Traceability Requirements
Once hazards and handling rules are set, the next step is simple: lock down the paper trail.
Verbal instructions don’t survive audits, client reviews, or handoffs between teams. On circular construction projects, written records show that materials were handled the right way, diverted from disposal, and tracked from one stop to the next. The U.S. generated about 600 million tons of C&D debris in 2018 – more than twice the amount of municipal solid waste – and about 76% of it was diverted to recycling or reuse. That number only means much if the records can back it up.
Required Records Before Work Starts
Before the first crew member touches a salvageable item, a pre-work documentation pack should already be in place in two forms: a physical binder in the job trailer and a shared digital folder the project team can access. This is the pack supervisors use during day-one onboarding, so it needs to be clear and ready to go.
It should include six core items:
- An existing building inventory log sorted by floor or zone so crews know where recoverable materials are located.
- A condition assessment report for major elements that notes the planned destination and any safety limits, such as asbestos or lead paint.
- An approved deconstruction and salvage plan that spells out removal order, needed tools, and protection steps for each priority component.
- A waste separation plan listing bin locations, required labels, and OSHA-compliant signs.
- Chain-of-custody notes for high-value or regulated materials – such as structural steel, large mechanical units, and treated lumber – that define who logs movements, which transfer documents are needed, and where those records live.
- Material passport templates with design data already loaded, so field crews only need to add the removal date, quantity, and condition.
Many U.S. public agency specs require a formal Construction Waste Management Plan before work starts, or within a set period after Notice to Proceed. Some specs also require that at least 75% of construction waste be recycled or salvaged, with monthly progress reports showing quantities by material type, diversion method, and destination facility. That’s why weight tickets, manifests, and receipts from recyclers and reuse partners need to be collected all the way through the job. Without them, the final diversion report is hard to defend.
For material passports, speed matters. Field workers should be able to update records without stopping the job. Mobile forms with drop-down fields, photo capture, and offline sync make that far easier. Platforms like ABLEMKR, which already track worker certifications and status, can also be used for material-level forms and photo proof. That cuts duplicate entry and keeps project data available in real time.
Onboarding Accountability Table
Use this table to show who reviewed each step and what proof exists. Each row should name one owner and one clear piece of evidence – not just a box that got checked.
| Checklist Item | Owner | Completion Status | Evidence |
|---|---|---|---|
| Crew induction: project circular-economy goals | Project Manager | Completed – 08/17/2026 | Signed induction roster |
| Review waste separation plan and bin layout | Site Superintendent | Completed – 08/17/2026 | Signed toolbox talk form |
| Training: inventory and condition assessment data entry | Sustainability Coordinator | Completed – 08/17/2026 | Sample entries reviewed and approved |
| Material passport access and update walkthrough | BIM/Information Manager | Completed – 08/17/2026 | Screenshot of completed practice entry |
| Trade license verification (e.g., Class B, C-21 Demolition) | General Contractor / Owner | Completed – 08/17/2026 | Copy of license on file |
| Safety credential check (OSHA 10 or OSHA 30) | Safety Manager | Completed – 08/17/2026 | OSHA card or digital certificate |
| Environmental/demo permits (HAZWOPER, EPA RRP) | Subcontractor Foreman | Completed – 08/17/2026 | 40-hr HAZWOPER cert or EPA RRP card |
| Worker certifications for salvage equipment use | HR / ABLEMKR Admin | Completed – 08/17/2026 | Digital certificates attached to worker profiles |
| Project orientation badge issued | General Contractor / Owner | Completed – 08/17/2026 | Issued project badge |
| Chain-of-custody protocol reviewed | Compliance Officer | Completed – 08/17/2026 | Signed acknowledgment form |
Missing records – like a fall-protection competent person card or a HAZWOPER credential on a rehab or demo job – are a common reason projects get held up. This table helps clear the crew for final worker-readiness sign-off.
4. Worker Verification and Final Sign-Off
Once the paperwork is done and the accountability table is filled in, there’s one last step: make sure every worker assigned to circular economy tasks is set to start the job safely.
Worker Readiness Verification Steps
After the records are complete, check that each worker is cleared to begin. Use a simple pass/fail gate: no one starts until identity, training, task approval, PPE, and site rules are checked.
Before anyone is cleared for a day-one assignment, confirm these five items in order:
- Identity and work authorization – government-issued photo ID and work-authorization documents, where required.
- Training and certifications – OSHA 10 or OSHA 30, plus any task-specific training tied to the assignment, such as 40-hour HAZWOPER or EPA Lead RRP, as required by scope.
- Equipment and task authorization – forklift cards, aerial lift certifications, rigging credentials, or competent-person designations required by the scope.
- PPE issue and fit – hard hat, hi-vis vest, safety glasses, gloves, steel-toe boots, plus task-specific protection. Record the issuer and date.
- Site rules and circular economy acknowledgment – sign off on project reuse, salvage, and diversion rules; do not strip, discard, or reuse materials without approval; report unsafe conditions immediately.
Once those five checks are done, move to supervisor sign-off.
For crews moving between jobsites, ABLEMKR can centralize certifications, training, and onboarding status before dispatch.
Supervisor Sign-Off and Key Takeaways
The final sign-off block should record the worker’s name, crew assignment, date, supervisor name, and safety representative name, if applicable. It should also include a line for restrictions. For example, approved for material sorting only; no equipment operation until forklift training is complete. That kind of note makes the sign-off audit-ready and easy to review later.
Before the supervisor signs, the closing briefing should reinforce four points with the crew: train for reuse and recovery goals, control hazards before work begins, protect materials during handling, and document every step.
Use the sign-off to lock the crew’s assignment status before day one begins.
Conclusion: What the Checklist Should Confirm Before Day One
Once onboarding, hazard checks, and paperwork are done, this last step confirms the crew is set to mobilize with the right personnel. Treat it as the day-one go/no-go gate.
Each worker should be able to explain the project’s reuse and recovery targets: which materials are tagged for salvage, what the diversion goal is for their phase, and who to ask if something falls outside the plan. That’s the starting point for circular work.
Before work begins, safety, equipment, material handling, and documentation all need a clear pass. A missing certification, an uninspected tool, an unclear sorting rule, or an incomplete record means mobilization stops.
Use the table below for the final readiness call.
| Condition | Ready | Not Ready |
|---|---|---|
| Circular goals | Worker can state diversion targets and salvage priorities | Worker cannot identify which materials are tagged for reuse |
| Safety & equipment | Training complete, tools inspected and signed off | Missing certification or uninspected tool |
| Material handling | Worker understands sort at removal, not at the pile, and protection rules | Rules not communicated or not acknowledged |
| Documentation | Records complete and accessible, supervisor-verified | Incomplete logs, missing sign-offs, or no reuse and recovery plan on file |
If any condition is unresolved, stop work until it is cleared.
FAQs
Who should lead circular economy crew training?
Circular economy crew training should be led by project leaders, foremen, and superintendents, with backup from experienced green building pros.
That matters because these are the people closest to the work. They can show crews what good practice looks like on the job, not just in a training room.
Managers should also pair less experienced workers with seasoned pros. On top of that, they should use skills audits and competency-based assessments to shape training around project needs and recognized industry standards.
What materials are usually saved for reuse first?
Training should start with the materials that matter most in circular construction: steel, cement, paper, plastic, and aluminum.
That gives teams a clear place to begin. Instead of trying to recover everything at once, they can focus on the items most often flagged for salvage and reuse.
Teams also need to learn how to review these materials across their life cycle. That means looking at how each one is sourced, used, recovered, and reused, so those decisions line up with environmental management plans and low-carbon goals.
What records are most important before work starts?
Before work starts, check that every crew member has the baseline and trade-specific qualifications the job calls for.
Key records usually include:
- Government-issued ID
- Valid state trade licenses
- Required safety certifications, such as OSHA 10- or 30-hour cards, CPR/First Aid, and project-specific permits
You should also confirm that each worker has finished site-specific orientation and, when needed, has current apprenticeship status or union credentials.
A centralized digital platform makes this much easier. It helps you keep records up to date, flag upcoming expirations, and maintain audit-ready compliance documentation.


